


4
3
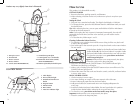
Product may vary slightly from what is illustrated.
How to Use
This product is for household use only.
GETTING STARTED
1. Remove all stickers, packing material, and literature.
2. When selecting a location for the unit, make sure to place it away from your
cabinets.
Setting the Clock
1. Plug unit into a standard wall outlet. The digital clock displays 12:00 AM.
2. To change the time, press the HOUR button then the MIN button until you reach
the desired time.
Tip: When selecting the time, you can press and hold the HOUR or MIN button
to speed up the time sequence.
Note: If you unplug the unit or power is interrupted momentarily, the unit will
remember the last set time, but after a few seconds, you will need to set the
time again.
3. To reset the time, follow steps 1 and 2.
Cleaning Coffeemaker before First Use
1. To open the cover, grip the front and lift cover to bring it all the way back until
it stays in the up position.
2. Pour cold water in the reservoir up to the 12-cup level mark on the water window.
Do not overfill.
3. Grip the brew basket by the handle and insert inside brew
basket holder (B). Be sure brew basket is in position inside
the brew basket holder, otherwise the cover will not close.
4. To close the one-piece cover, press down on the front
until it snaps into place.
Important: Make sure the cover snaps securely into place.
5. Place the carafe on the Keep Hot plate.
6. Plug in the unit and press the ON/OFF button. The POWER indicator light
illuminates and brewing cycle begins.
7. When cycle is finished, press the ON/OFF button twice to turn off the unit. The
POWER indicator light goes off.
8. Discard the water from the carafe and rinse the carafe, carafe lid, and brew basket
in warm, sudsy water.
READY TO BREW COFFEE
1. Lift the one-piece cover to open.
2. Use water markings on carafe to fill water reservoir with cold water.
3. Insert a basket style paper filter into the brew basket.
4. Add ground coffee (we recommend one or two heaping tablespoons for
every cup).
5. Insert brew basket into brew basket holder. Be sure brew basket is in position
inside the brew basket holder, otherwise the cover will not close.
6. To close the cover, press down on the front until it snaps into place.
Important: Make sure the cover snaps securely into place.
7. Place the carafe on the Keep Hot plate.
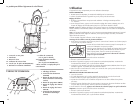
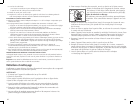
1. One-piece cover
2. Showerhead
3. Water reservoir
4. Water window
† 5. Carafe (Part# DCM2900W-03)
6. Nonstick Keep Hot plate
7. Control panel (see A for details)
† 8. Removable brew basket (inside)
(Part# DCM2900W-01)
† Consumer replaceable/removable parts
CONTROL PANEL
1. Clock display
2. Power indicator light
3. ON/Off and AUTO brew
button
4. Program button
5. Minute button
6. Hour button
7. Auto brew indicator light
A
B