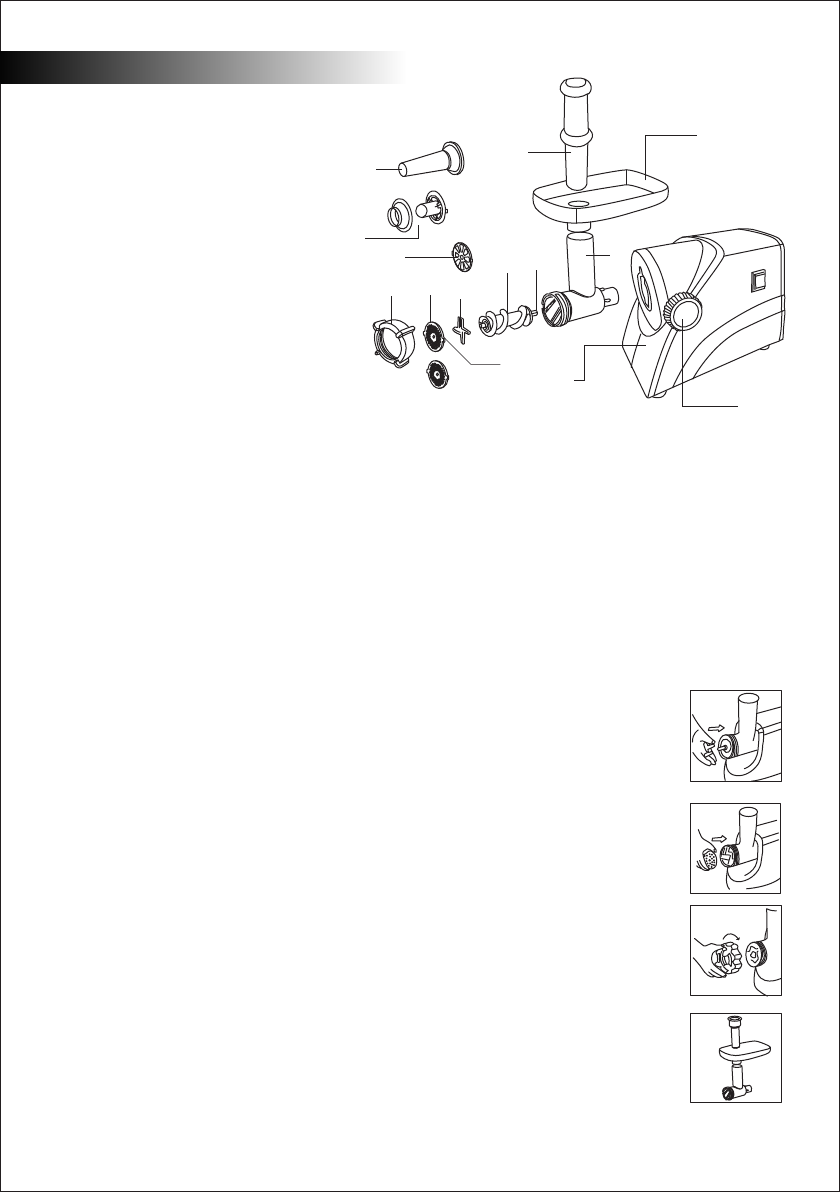
Parts Identification
1. Motor unit
2. Mincer head with inlet chute
3. Worm
4. Blade
5. Coarse & fine disc
6. Nut
7. Tray
8. Round pusher
9. Sausage disc
10. Locking screw
11. Sausage stuffer
12. Kebbe Attachment
Product Features :-
1400W as locked motor power - for the toughest of meat mincing.
Stainless Steel Blades and feeder - screw provides durability and efficiency
One speed operation - for all mincing operations
Reverse speed - assists in removing all blockages during operation.
Aluminium tray - for ease of feeding
Sausage stuffer - for making sausages.
Kebbe attachment - for making Kebbes.
Using your Meat Mincer
Your Meat Mincer is intended for grinding meat and vegetables for domestic purposes only. For indoor use
only. Kindly ensure that all the packaging material has been removed from the unit. Remove any instruction,
sticker etc. Ensure that the ratings on your mincer are the same as the line voltage in your home.
Wash all the parts other than the base unit in warm sudsy water and allow to dry. Your meat mincer is not only
for grinding meat but can also be used for grinding vegetables, and making sausages..
Assembly of Mincer Head:
1. Remove the locking screw (10) by turning it in an anti-clockwise direction. With the inlet
chute vertical, insert the mincer head (2) into the hole in the motor unit.
NOTE :- Ensure that the O-ring on the rear of the worm is in place.
2. Locate the plastic tab on the motor housing between in the space between the 2 circular
ribs on the Mincer head.
3. Fit the locking screw (10) & hand-tighten to lock the head in place.
Changing cutting disc
1. Remove the nut (6) by rotating it in an anti-clockwise direction.
2. Remove the disc (5), blade & worm & clean if necessary.
3. Mount the blade (4) on the worm (3) with the round side facing the worm and the smooth
side in contact with the disc (Figure 1)
Note : the meat will not be minced if the blade is mounted with the wrong side facing the
screw.
4. Place te required cutting disk (5) (Figure 2) into the end of the Mincer head, locating the 2
tabs on the disks into the recesses in the head.
5. Fit & hand-tighten the nut (6) (Figure 3).
6. Fit the tray (7) (Figure 4) into the top of te inlet chute.
-3-
Fig. 3
Fig. 4
Fig. 1
Fig. 2
English
2
7
8
9
11
2a
3
4
5
5a
6
1
12
10


