


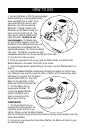


1. Be sure the Mixer is OFF (O) and unplugged
before inserting or removing attachments.
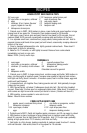
Since one Beater has a ‘collar” on its
stem while the other doesn’t, each
Beater fits only into one opening.
Match the “collared” beater to the
illustration on the Mixer to help you
place it into the right hole (A). You
may have to rotate it slightly until it
locks into place. Beaters are not
interchangeable. If a Beater does
not lock in after rotating it, check the
illustration on the Mixer and be sure you
are placing the correct Beater into the
appropriate opening. Do not force a Beater
into a slot. The Whisks, however, are inter-
changeable and either one can be inserted into either hole.
2. Plug the Cord into an outlet.
3. Place the ingredients into a bowl, grip the Mixer handle, and position the
Beaters/Whisks in the center of the food to be mixed.
4. Select the appropriate speed setting for the task. See the “Mixing Guide” on
page 5.
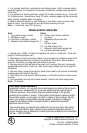
5. Guide the Beaters/Whisks continuously through the mixture for uniform mix-
ing. Whenever you wish to scrape the sides or bottom of the bowl using a hand-
held utensil, be sure to turn the Speed
Control Switch OFF (O). Place the
Mixer on the Heel Rest so that
batter can drain into the bowl (B).
6. Turn the Mixer off and
unplug when finished. To
remove the Beaters/Whisks,
position the Mixer over a
bowl or sink and pull the
Beater Eject Lever up.
POWER BOOST
1. The Power Boost lets you
increase the mixing speed to the
maximum power level from any
setting. When you feel the Mixer slowing
down or straining in tough mixing tasks (such as mixing cookie dough), press the
Power Boost Button.
2. As soon as you release the Power Boost Button, the Mixer will return to your
pre-selected speed.
HOW TO USE
4
A
B