


How to Use
This appliance is for household use only.
BEFORE FIRST USE
Note: Time display will flash when you plug in your coffeemaker. You may set clock
before, during or after brewing. (See SETTING THE CLOCK/TIMER.) You do not need
to set clock before manual brewing. It is only absolutely necessary to set the clock if
you are using the auto brew function.
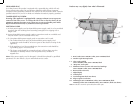
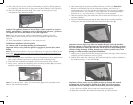
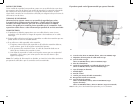
• Grasp the integrated handle on the water reservoir and pull out from coffeemaker;
remove lid to make filling easier. Fill carafe with 6 cups of fresh water and fill
reservoir. Replace water reservoir with lid and carafe.
• Brew through the system, using an 8 – 12 cup basket-style paper filter as instructed
in BREWING COFFEE. Do not add coffee grounds for this initial brewing, as this is
simply to clean the interior of the unit and remove any dust or residue left from the
manufacturing process.
• Once water has brewed through, press ON/OFF button.
• Clean water reservoir, brew basket, carafe and lid. (See CARE AND CLEANING.)
BREWING COFFEE
1. Grasp handle and pull to remove the brew basket. Place an 8 – 12 cup basket-style
paper filter inside basket and add coffee grounds (usually one heaping tablespoon
for every cup – adjust to taste). Replace brew basket.
2. Grasping integrated handle, pull out water reservoir. Fill carafe with cold water to
desired water level and pour into reservoir; the lid of the reservoir may be removed
to make pouring easier. Replace water reservoir with lid, making sure it snaps in
place.
Caution: Do not overfill water reservoir.
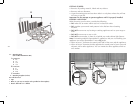
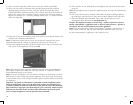
3. Replace empty carafe, making sure it is "seated" properly so that it fits against the
lever at the back.
Important: If carafe is not placed against the safety lever at the back of the unit, your
coffeemaker will not operate properly.
4. Press ON/OFF button. “ON” appears in the display and LED light above the button
will illuminate as brewing begins.
5. After brewing is complete, brewed coffee will be kept warm on the “Keep Hot”
carafe plate for up to 2 hours.
Note: Your coffeemaker features a 2-hour auto shutoff. Your coffeemaker will maintain
the coffee’s temperature for up to 2 hours before shutting off automatically.
6. Once coffee grounds have cooled, carefully remove brew basket and discard paper
filter with grounds. Replace brew basket.
7. Coffeemaker can be turned off at any time by pressing the ON/OFF button.
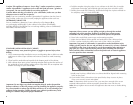
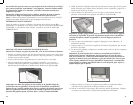
SNEAK-A-CUP
®
INTERRUPT FEATURE
The Sneak-A-Cup
®
Interrupt Feature lets you pour a cup of coffee before brewing is
complete. When the carafe is removed, the coffee flow will be paused for 20 seconds.
After 20 seconds, the drip flow will start again.
Important: Carafe must be replaced in less than 0 seconds to prevent water from
overflowing the brew basket.
Caution: Do not pull out brew basket when using this feature, as it is filled with hot
coffee.
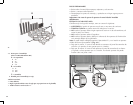
SETTING THE CLOCK/TIMER
You may set the clock before, during or after the brewing cycle.
To set current time: Press the HOUR, then MIN buttons until you reach the current
time. Hold down buttons to advance quickly.
SETTING THE AUTO BREW FUNCTION
1. Follow steps 1 – 3 in BREWING COFFEE.
2. Make sure clock is set properly to present time (as instructed in SETTING THE
CLOCK/TIMER).
3. Set auto-on time: Press the PROG button. (PROGRAM will flash on the display,
indicating auto brew time is being set.)
4. Press HOUR and MIN buttons until you reach your desired preset brew time.
5. After a few seconds, display will return to real time, indicating the PROG time has
been set.
Note: To check preset auto-on time at any time, press PROG and preset time will
display for a few seconds as “PROGRAM” flashes on the display. When it stops
flashing, the display will automatically return to real time.
6. Press AUTO button; the preset program time will flash twice in the display to
remind you of the time you set. The word “AUTO” will appear and the LED light
above the AUTO button will illuminate; these will remain until brewing begins
at preset auto-on time. At that time, “AUTO” will go out as “ON” appears in the
display and the LED light of AUTO will go out as the light over the ON/OFF button
illuminates.
7. To cancel auto brew, press ON/OFF button.
COFFEE BREWING TIPS
• Always use fresh, good water when making your coffee. Since coffee is 98% water,
the quality of the water is extremely important to the taste of the coffee made with
it.
• Stir coffee in carafe before serving to evenly distribute the flavor.
• Coffee that is poured during brewing cycle may vary in strength from the finished
brew.
• Not sure how much coffee to use? Begin by using 1 level scoop of medium grind
coffee for each cup of coffee to be brewed.
• Never reuse coffee filters; they absorb flavors from the brewed coffee and will give
the newly brewed coffee a stale flavor. They may also tear and allow grinds to drip
into the newly brewed coffee.
• If filled carafe is left on the “Keep Hot” plate, be sure to remove the coffee grounds
from the brew basket as soon as they have cooled slightly. This will keep the coffee
from developing a bitter taste.