


Operation
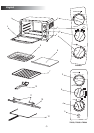
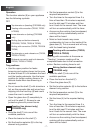
The function selector (6) on your appliance
has the following symbols:
OFF
Top elements on (toasting) (TRO2000 only)
Toasting with convection (TRO50, TRO55
& TRO60)
Lower elements on (baking) (TRO2000
only)
Broiling (top and bottom elements)
(TRO2000, TRO50, TRO55 & TRO60)
Broiling with convection (TRO50, TRO55 &
TRO60)
Top elements on and rotisserie on (TRO50,
TRO55 & TRO60)
Rotisserie convection and both elements
(TRO50, TRO55 & TRO60)
Tray positions
• Use the upper position for faster
browning and cooking times, but be sure
to allow at least 2.5 cm between the food
and the heating elements. Use the lower
position for longer cooking times or for
delicate foods when less browning is
required.
• Do not cover the shelf (7) with aluminium
foil, as this prevents fats and juices from
dripping into the food tray (8) and could
cause the oven to overheat.
• Open the glass door (2) completely to
pull out the shelf (7). Be sure to use
protective gloves to prevent burns.
Toasting (top element only)
(TRO2000 only)
• Slide the shelf (7) into one of the
available positions.
• Place the bread on the shelf (7).
• Set the function selector (6) to the top
element only position.
• Set the temperature control (3) to the
required temperature.
• Turn the timer to the required time. If a
time of less than 10 minutes is required,
turn the dial past 10 minutes and then
turn it back to the correct time. The oven
will turn on automatically with the timer.
• As soon as the cooking time has elapsed,
cooking will stop automatically and an
alarm will be heard.
• Moist or fresh breads may cause
condensation to form on the inside of the
glass door (2). This is normal and will vary
with the bread being toasted.
Toasting with convection (TRO50,
TRO55 & TRO60)
Toasting with convection is the same as
"Toasting", however cooking will be
completed faster due to the convection
action. Reduce cooking times to suit.
Baking (bottom element only)
(TRO2000 only)
• Slide the shelf (7) into one of the
available positions.
• Place the food on the shelf (7).
• Close the glass door (2).
• Set the function selector (6) to the bottom
element only position.
• Set the temperature control (3) to the
required temperature.
• Set the timer (4) to the required baking
time.
• Turn the timer to the required time. If a
time of less than 10 minutes is required,
turn the dial past 10 minutes and then
turn it back to the correct time. The oven
will turn on automatically with the timer.
• As soon as the cooking time has elapsed,
cooking will stop automatically and an
alarm will be heard.
-7-
English