


en en
2
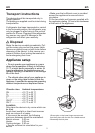
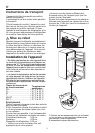
Transport instructions
The device should be transported only in
upright position.
The packing as supplied must be intact during
transportation.
If refrigerator has been transported or carried
in the horizontal position, the refrigerator may
only be plugged in after being in the vertical
position for 4 hours. Plugging in the refrigerator
any sooner may result in damage to the
refrigerator and af
fect your warranty.
Disposal
Make the device unusable immediately
. Pull
out the mains plug and cut the power cable.
Remove or destroy snap or latch locks before
disposing of the device. In this manner you
prevent children from locking themselves in
and endangering their lives.
Appliance setup
• Do not operate your appliance in a room
where the temperature is likely to fall below
10 °C at night and/or especially in winter. At
lower temperatures the appliance may not
operate, resulting in a reduction in the storage
life of the food.
• The climate class rate of your appliance is
given on the rating label located inside the
appliance. It specifies the appropriate operating
ambient temperatures as explained below.
Climatic class Ambient temperatures
SN.......................+10 °C to 32 °C
N .........................+16 °C to 32 °C
ST .......................+18 °C to 38 °C
T..........................+18 °C to 43 °C
SN-ST.................+10 °C to 38 °C
SN-T ...................+10 °C to 43 °C
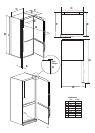
• Make sure that sufficient room is provided
around the appliance to ensure free air
circulation.
Fit the two plastic wall spacers supplied with
the appliance rotating 1/4 turn to the condenser
at the back of the appliance.
Location
Only place the device in dry rooms which can
be aired.
A
void direct sunlight or direct heat sources
such as a stove or a heater.
If this cannot be avoided, the following
minimum distances should be maintained:
Electric stoves: 3,00 cm
Heater: 3,00 cm
Cooling devices: 2,50 cm
• Ensure sufficient air circulation for your
device.
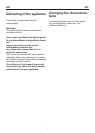
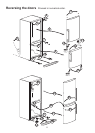
2
1
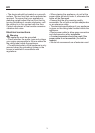
1
1-Screw pins on the lower hinges are removed
from their place with the aid of a suitable wrench.
2-Assembly the kick plate