


4
ANTIGUA
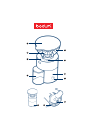
COMPONENTS AT A GLANCE
1. Lid
2. Bean container
3. Grinding control
4. Bean container release
5. Inlet cover
6. Ground coffee container
7. Time/quantity control
8. Power cord inlet
9. Cord-tidy
10. Stand by Mode - ON/OFF Button
11. Main Power - ON/OFF Switch
INITIAL OPERATION
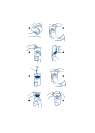
Place the appliance on a level surface. Unreel the required
length of cord.
It is important to keep the cord short. Insert the cord into
the power cord inlet provided so that it is clamped and
insert the plug into the socket outlet. Pack the excess cord
length in the cord-tidy (fig.12). Open the lid (fig.13) of the
bean container, fill the bean container with the desired
quantity of coffee beans (250g max.) (fig.14) and close the
lid (fig.15). The appliance is then ready to operate.
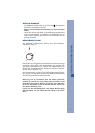
SETTING THE GRINDING CONTROL
The main adjustment positions stated on the control for the
degree of grinding are normally sufficient. The degree of
grinding can be adjusted by twisting the bean container
(fig.16).
= fine grinding
(e.g. for BODUM
®
Granos espresso coffee machine)
= medium grinding
(e.g. for BODUM
®
Kona filter coffee machine)
= coarse grinding
(e.g. for BODUM
®
French Press
®
coffee maker)
If the three adjustment positions do not precisely match
your personal taste you can also grind your coffee by
choosing any intermediate position.
If the appliance has been filled with coffee beans, the
grinding control must only be operated when the motor is
running.