


English 3
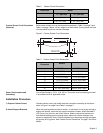
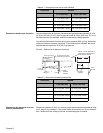
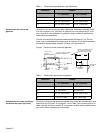
Custom Drawer Front Dimensions
(Optional)
Build custom drawer front to the dimensions specified in Table 3 on page 3 and-
Table 4 on page 3 below. All four edges must be finished. If using wood, the back
must be sealed to prevent moisture damage.
Figure 3: Custom Drawer Front Dimensions
Power Requirements and
Grounding
Circuit Specifications: 120 V, 15 A, 60 Hz. The outlet must be properly grounded
in accordance with all applicable codes.
Installation Procedure
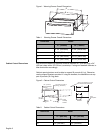
1) Prepare Cabinet Cutout Prepare cabinet cutout and install electrical connection according to the dimen-
sions in Figure 2 on page 2 and Table 2 on page 2.
2) Install Support Brackets When the opening does not have a bottom, or the bottom is not strong enough to
support the drawer, install the two support brackets included. Attach brackets 8”
(203.2 mm) from the front wall of the cabinet. Make sure that the brackets are
level before installing screws through screw holes into cabinet sidewalls (two
screws on each side). Note: Cabinet sidewalls must be strong enough to support
45 pounds (20.5 kg) each. See “Cabinet Cutout Dimensions” on page 2 for further
details.
C 22 1/4” (565.2 mm) 22 1/4” (565.2 mm)
D 7/16” (11.1 mm) 1 3/4” (44.5 mm)
Table 2: Cabinet Cutout Dimensions
Dimension Model
27” (685 mm) 30” (762 mm)
Table 3 Custom Drawer Front Dimensions
Dimension
Models
27” (685 mm) 30” (762 mm)
A 26 5/8” (676.3 mm) 29 1/4” (743 mm)
B 11 1/4’ (285.8 mm) 11 1/4” (285.8 mm)
C 1 1/4” (31.6 mm) 1 1/4” (31.6 mm)
D 1 1/4” (31.6 mm) 2 9/16” (65.1 mm)
E 2 3/4” (69.9 mm) 2 13/16” (71.5 mm)
F 2 1/4” (57.2 mm) 2 1/4” (57.2 mm)
G 21 1/16” (535 mm) 23 5/8” (600.1 mm)
A
F
D
B
E
C
G
Pilot Holes
1/2" (12.7 mm)
Diameter Hole