


English
Our products are engineered to meet the highest
standards of quality, functionality and design.
We hope you thoroughly enjoy the new Braun
appliance.
Caution
Read all instructions before using this product.
This appliance must kept out of the reach of
children! Before plugging into a socket, check
whether your voltage corresponds with the voltage
printed on the bottom of the appliance.
Do not put the carafe on other heated surfaces
(such as stove plates, hot trays, etc.).
Before you start preparing coffee a second time,
always allow the coffeemaker to cool down approxi-
mately for 5 minutes between brewing (switch the
appliance off), otherwise steam can develop when
you pour cold water into the water container and this
could cause scalding.
The hotplate
9
heats up when the appliance is
switched on. Avoid touching it and never let the cord
come into contact with it.
Braun electric appliances meet applicable safety
standards. Repairs on electric appliances must only
be done by authorised service personnel. Faulty,
unqualified repair work may cause accidents or
injury to the user.
The cord of the appliance may only be replaced by
an authorised Braun Service Centre as a special tool
is required.
Important
This appliance was constructed to process normal
household quantities. Always use cold water to
make coffee. Warm water or other liquids could
cause damage to the coffeemaker.
Before using the first time, or when the coffeemaker
has not been used for some time, fill the water
container
3
to the maximum level with cold water
(i.e. without coffee and without a filter). Turn on the
coffeemaker and allow the water to flow through.
Maximum cups
12 cups (125 ml each)
18 cups ( 83 ml each)
Functions
●
AromaSelect feature
●
Time display (24 hour clock)
●
Manual operation
●
Automatic operation (24 hours)
●
Brewing small amounts (1-3 cups – 125 ml each)
●
Audio-visual «coffee ready» signal
●
Automatic hotplate switch-off
(from 3.59 hours to 0.00 hours)
●
Adjustable heating temperature (+/– 5°C)
●
Descaling/decalcifying control
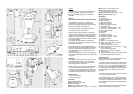
Description
1
Cord storage
2
Water level indicator
3
Water container
4
Space compensator
D
Water filter cartridge
d
Dial for water filter exchange
5
AromaSelect dial
(mild taste = /strong taste = )
6
Cover for the water container
7
Filter support bracket
8
Filter holder
9
Hotplate
j
Temperature sensor
k
Decalcifying indicator «calc»
l
Temperature selector «–temp.+»
(for the hotplate
9
)
m
Display
n
Button «h» (for setting the hours)
o
Button «min» (for setting the minutes)
p
Yellow control lamp
(for the small amounts operation)
q
Button for the small amounts operation «1-3
»
r
Green control lamp
(for the automatic operation)
s
Button for the «automatic» operation
t
«On/off» button
u
Red/green control lamp (for on/off setting and the
automatic hotplate switch-off feature)
Setting the clock
Plug the appliance in. Three noughts appear on the
display
m
of the electronic digital clock.
To activate the timer, both buttons
n
and
o
must be
pressed for at least 2 seconds each. Then press the
buttons «h»
n
or «min»
o
as described below until
the correct time of day appears on the display
m
.
5 seconds after the last adjustment, the coffeemaker
will automatically return to the previous mode of
operation.
To set the correct time of day, first press the button
«h»
n
to programme the hours.
Then press the button «min»
o
to programme the
minutes. Recommendation: Just before reaching the
correct time, repeatedly press the buttons «h» and
«min» without holding down to avoid going past the
time required.
The dots between the hours and minutes will flash
once the clock has been programmed.
32