


HELPFUL BAKING HINTS
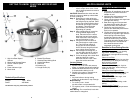
GETTING TO KNOW YOUR TWIN MOTOR STAND
MIXER
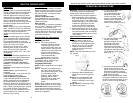
Step 2: As the ingredients start to form
a ball, scrape down sides of bowl
with a plastic spatula then remove
your dough.
CAUTION: Do not use the mixer near the
edge of a counter or table top where there
is a risk of falling off.
Step 3: Depending on what recipe you
are preparing, manually kneading
the dough may be required. Place
dough onto a well floured surface
and knead until dough is smooth
and elastic. This should take
approximately 3-5 minutes
depending on quantity.
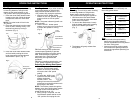
Step 4: After kneading dough, place into
a well greased, large mixing
bowl. Place the bowl in a warm,
draft-free area and cover with a
clean dish towel. Allow dough to
rest until it doubles in size.
Step 5: Plunge a fist into the centre of
the risen dough to expel excess
air. Then fold outer edges of
dough into the centre several
times. Remove dough from bowl
onto a lightly floured surface.
Step 6: Place dough into baking tins, or
cut and shape dough for making
rolls, small loaves, or buns etc…
Step 7: Cover the dough with a clean dish
towel and place in a warm,
draft-free area till it rises. Then
glaze the surface and bake.
Helpful Hints for a Successful
Cakes
1. High-Low Bowl Speed
Selector
2. Mixer Head Release Button
3. On/Off – Beater Speed
Selector
4. Power Indicator Light
5. Mixer Head
6. Beater Eject Button
7. Stainless Steel Mixing Bowl
8. Mixing Bowl Base
9. Main Unit
10.Beaters (x2)
11.Dough Hooks (x2)
Finishing Effects
Topping breads and buns:
1. Sprinkle loaves or buns with sesame,
poppy, or caraway seeds before baking.
2. Drizzle shredded cheese on top of loaf
5 minutes before baking is over.
3. Sprinkle icing sugar on sweet buns or
muffins after they have cooled.
Glazes:
1. Any time before or during baking
glazes can be brushed on top of dough.
Before Baking:
1. For a shiny crust – brush
top with cream or evaporated milk.
2. For a glossy crust – brush with beaten egg
whites.
After Baking: For a matt finish, brush with
melted butter or margarine.
Over beating, l
1. Make sure all ingredients are at room
temperature and warm the bowl if
weather is cold.
2. Add flavoring and essences to the
shortening for a better flavor.
3. When creaming butter and sugar beat
until light and creamy.
4. Beat whole egg until incorporated
into batter before adding the next
when more than one is required.
5. Divide flour and liquid into two
portions and alternately add with the
liquid on low speeds.
6. Cooking times and temperatures are
meant only as a guide. Light mixtures
should spring back when lightly
touched and heavier cake mixes
should be tested using a toothpick.
Fruit cakes should be tested using a
small sharp knife. This should be
done towards the end of the
suggested cooking time.
Reasons for Poor Baking Results
Sponge cakes shrink-
Unbalanced ingredients, over beating
egg whites, sudden changes in
temperature or draught when removing
from oven.
Cakes do not Rise-
Mainly due to over beating, but can also
be caused by oven being to hot during
the first part of cooking.
Centre of Cakes Sink-
Too much fat, raising agent, liquid or
sugar; too little flour; under cooking or
cooking too slowly.
Cakes Run Over Edges of Pans-
Overfilling cake pans, oven too cool, too
much sugar, too much raising agent.
Hard Outer Crust-
Too much flour, too little sugar, over
mixing, oven too hot.
Moist, Sticky Outside-
Too much sugar, over beating, under
baking.
Coarse Crumbly Texture
ow baking temperatures.
Technical Specifications
Voltage: 120V., 60Hz.
Power: 480 Watts
*Illustrations may vary from actual product
72