


•
Warning: Never plug in the control part when it is not installed in the fryer
body with heating element in the oil container. Do not immerse
t
h
e
co
n
t
r
o
l
pa
r
t,
co
r
d
o
r
p
l
ug
in w
ate
r.
Read all the sections of this booklet and follow all the instructions
carefully.
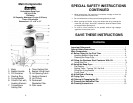
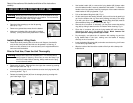
• Open the lid by pressing up on the lid opening
latch (#10). Fig. 1
• Remove any printed documents from the basket.
• Make sure the basket lifting knob (#9) is installed
correctly. (It may come out of place while in transit.)
Installing Basket Lifting Knob
• Rotate knob while pressing with some force until flat part of socket fits
over the flat of the post and the knob can be pushed in all the way. If
knob is not fully inserted, it will come out easily and it might be difficult to
lower and raise the basket.
Fig. 1
Prior to First Use, Clean the Unit Thoroughly
Warning: Always let the fryer cool completely for 1 ½ to 2 hours before
taking it apart for cleaning. Never carry or move the Deep Fryer
with hot oil inside. Before cleaning, always make sure the plug
is not in the wall socket.
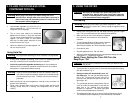
• Remove the lid (#12). Slide the lid to the right, then remove by pushing
back the right hand side. Fig. 2
• Turn basket lifting knob counter-clockwise to raise the frying basket (#5)
to the up position. Fig. 3
• Release the basket handle (#2) from its storage place by pressing with
your index finger. Fig.4
Fig. 2 Fig. 3 Fig. 4
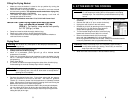
•
Use basket handle (#2) to remove the frying basket (#5) Always make
sure the basket handle is securely attached to the basket. To attach the
handle to the frying basket, insert the metal part of the handle inside the
metal bracket on the frying basket. Fig. 5
• Pull out the basket lifting knob (#9). Fig. 6.
• Lift the control part with heating element (#6) out of its slots by pushing it
up from the bottom with one hand while holding the body of the deep
fryer with your other hand. Please note: Basket lifting knob (#9) must be
removed before lifting out the control part (#6). Fig.7
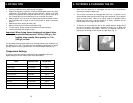
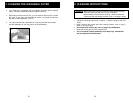
• Remove the oil container. If necessary, you may also remove the sealing
ring (#4) by sliding it down from the oil container when cleaning. Fig. 8
• Clean the oil container (#3) and the frying basket (#5) with hot water,
dishwashing liquid and a non-abrasive sponge. Never immerse the
control part with heating element (#6) in water.
• Dry thoroughly, and place the oil container with sealing ring and the
frying basket back in the fryer, making sure the basket is hanging
securely on the oil container.
• Insert the basket lifting knob (#9) and make sure that turning it will lower
or raise the frying basket (#5).
• Wipe the inside of the lid and the outside of the fryer with a damp cloth.
Install the lid.
Fig. 5 Fig. 6 Fig. 7
4
1. BEFORE USING FOR THE FIRST TIME
5
Fig. 8