


Assembly Instructions
Before using your food processor for
the first time, do the following:
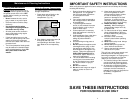
1. Read all the instructions in this
instruction manual.
2. Remove the unit from packaging.
Warning: BLADES ARE VERY
SHARP! Take extra care when
removing the protective blade
covers to prevent injuries.
Important Note: Always replace the
protective blade covers onto the blades
when the blades are not in use.
3. Wash the unit and attachments
according to the “Maintenance &
Cleaning” section. DO NOT
IMMERSE MAIN UNIT IN WATER.
4. Once the unit has been thoroughly
cleaned, it is ready for assembly
and use.
Assembling the Food Processor
The food processor can be used either
with both the upper and lower chopping
blades or just the lower chopping
blade. The food processor can also use
either of the blade holders instead of
the chopping blades.
Note: Before assembling the food
processor, ensure that it is NOT
plugged into an electrical outlet.
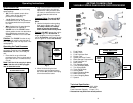
Assembling Both Chopping Blades
• Place the food processor bowl
securely on the main body. (Fig. 1)
• After having assembled the chop-
ping blades, carefully place the
chopping blade assembly onto the
shaft of the food processor bowl.
(Fig. 4) Ensure that the blades are
securely in place before continuing.
• Once the food processor bowl is
securely in place, remove the
protective blade covers and carefully
assemble the upper and lower chopping
blades. (Fig. 2 & 3)
4
FOOD
PROCESSOR
BOWL
MAIN BODY
Fig. 1
PROTECTIVE
BLADE
COVERS
Fig. 2
UPPER
CHOPPING
BLADE
LOWER
CHOPPING
BLADE
CAUTION!
BLADES
ARE
SHARP!
Fig. 3
FOOD
PROCESSOR
SHAFT
CHOPPING
BLADE
ASSEMBLY
Fig. 4
Using the Lower Chopping Blade
Only
• Place the food processor bowl
securely on the main body. (Fig. 1)
• Once the food processor bowl is
securely in place, remove the
protective blade cover from the
lower chopping blade and carefully
place the lower chopping blade onto
the shaft the food processor bowl.
(Fig. 4)
Assembly Instructions
Using the Blade Holder
• Place the food processor bowl
securely on the main body. (Fig. 1)
• Select the desired blade. There are
five (5) different blades to choose
from:
1. Thin Shredding Blade
2. Thick Shredding Blade
3. Thin Slicing Blade
4. Thick Slicing Blade
5. Grating Blade
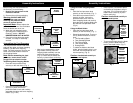
• To attach the blade to the blade
holder, take the blade holder in one
hand and insert the blade tab first
into the opening. (Fig. 5)
5
BLADE
BLADE
TAB
Fig. 5
PRESS
ON THE
BASE OF
THE
BLADE
TO SNAP
IT INTO
PLACE
Fig. 6
• Once in place, use thumb to press
on the base of the blade to snap it
into place. (Fig. 6) Ensure that the
blade holder is securely in place
before continuing.
Caution: Handle blade carefully to
avoid cuts and injuries.
• To remove the blade from the blade
holder, push the blade from the
back of the blade holder. (Fig. 7)
BACK OF
BLADE
HOLDER
PRESS
DOWN ON
BACK OF
BLADE
Fig. 7
Caution: Handle blade carefully to
avoid cuts and injuries.