


HINTS & TIPS
OPERATING INSTRUCTIONS
Read all the sections of this booklet and follow all the instructions carefully.
• Place the rotisserie on a clean, dry,
heat proof surface where it is not
directly below cabinets, near walls or
near flammable materials.
• Meat can be seasoned before
cooking without losing excess
moisture or juices.
• The most accurate method of
determining the degree of doneness
is with a meat thermometer inserted
into the center of the thickest portion
of the meat.
• The Suggested Cooking Times are
only a guide and are based on the
temperature of refrigerated food.
• To prevent foods from sticking to the
fillet/veggie rack, lightly oil the rack
before placing food in it.
• It is not necessary to preheat the
rotisserie before cooking.
• When cooking is completed, turn the
timer to the “Off” position to turn the
rotisserie off.
• Use hot pads or oven mitts when
removing food or handling the racks.
• NEVER
cook without the door of the
rotisserie in place and closed.
• Because of the high fat content of
ducks, it is necessary to check the
drip tray occasionally. If necessary.
Remove fat with baster, siphon or
ladle.
Depending on the shape and length
of the duck, the neck may need to
be cut back to allow the bird to sit
properly on the poultry tower.
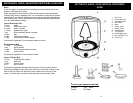
Assembly
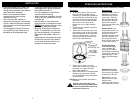
1. To attach the door to the unit, hold
door with viewing window facing
forwards you. Locate the keyhole slot
on top of the door with the door post
on the top of the unit and insert door
slot over post. Ensure that the base
of the door is in the track at the
bottom of the unit. (see illustration
below)
2. Position the tray support in the base
of the rotisserie.
3. Secure the non-stick drip tray on the
tray support, lining up the drive shaft
with the impression on the underside
of the non-stick drip tray. If it is not
properly secured, the non-stick drip
tray will not rotate correctly.
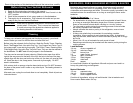
Accessories
Poultry Tower: Tower is
designed to fit securely
inside the body cavity of
most poultry. Slide the
bird onto the tower with
the legs down. Extend
legs over the support
rings near the base of the
poultry tower.
Roasting Rack: The
roasting rack has four (4)
prongs which are made
to secure a roast for
rotisserie cooking. Center
the roast vertically over
the prongs and slide it
down until the meat rests
on the center support .
Fillet/Veggie Rack:
Insert the fillet/veggie
rack in between the
prongs of the roasting
rack making sure that the
prongs go into the two (2)
mounting loops on the
sides of the fillet/veggie
rack.
Door Track
Keyhole Slot
& Post
Non-stick Drip Tray
Tray Support
4. Place unit on a clean, dry, level
surface with at least six (6) inches of
clearance on all sides. (Do NOT
place under cabinets.)
5. Place desired food on the appropriate
accessory (poultry tower, roasting
rack or fillet/veggie rack) and position
on the drip tray.
Important: Never operate unit without a
food load.
Caution: Use oven mitts or hot
pads when removing cooked food
or racks. Cooked items will be hot
and burns could occur.
Non-Stick Drip Tray::
Place the non-stick drip
tray onto the tray support
on the base of the unit.
Flavor Tray: You can
add liquid smoke, wine,
herbs or other
seasonings with which to
flavor the poultry or roast.
4
7