TOASTING
Toast breads, bagels, English muffins,
and other breakfast treats with even
golden brown results. For best results,
use both top and bottom elements.
Operation
1. Ensure crumb tray is in place.
2. Insert the wire rack into the oven.
Place food to be toasted on the
wire rack. When toasting only one
or two items, place food on the
wire rack in the center of the oven.
Note: Wire rack should be positioned
in the middle of the oven with the
indentations pointing down.
3. Plug oven into the electrical outlet.
The oven will beep to advise that it
is plugged in and the power light
will go on.
4. Adjust the timer to the desired
time, by pressing either the
increase or decrease timer button.
Note: The time on the oven is
automatically set at 90 minutes. Press
the increase timer button to go from 90
minutes to zero minutes and continue
to press it to increase incrementally
from zero or, press the decrease timer
button to decrease incrementally from
90 minutes.
5. The temperature is automatically
defaulted to start on the highest
temperature (450 °F). Adjust to
the desired temperature by
pressing either the increase or
decrease temperature button.
Note: If desired, push the “ELEMENT”
function button once to deactivate the
bottom element, or press twice to
deactivate the top element.
Operating Instructions
5
CAUTION: DO NOT TOUCH TOP OF OVEN WHEN IN USE.
EXTREMELY HOT!
6. Once having set the desired time
and temperature, press the
“START/STOP” button in order to
start the toasting process. Both top
and bottom elements should come
on automatically. The timer will
begin to count down immediately
after pressing the “START/STOP”
button.
7. When the toasting time is done,
the oven will turn off and beep
continuously. The digital display
lights will also be extinguished.
8. Remove toasted food items using
oven mitts and appropriate
utensils.
9. Always unplug oven when
finished cooking, and allow to
cool.
WARNING: Never leave the oven
unattended when in use.
CAUTION: Do not leave oven
plugged in when not in use.
Toasting Guide
Use the following as a guide for
toasting:
9 min.
8 min.
7 min.
TIME
450 ºFDARK
450 ºFMEDIUM
450 ºFLIGHT
TEMPERATURECOLOR
6
ROTISSERIE
For best results, we recommend using
both top and bottom elements during
the rotisserie function. We also
recommend that you do not cook a
roast larger than 5 lbs. on the rotisserie
skewer. For larger roasts we re-
commend roasting and not using the
rotisserie. Poultry should be bound in
string to prevent the chicken legs or
wings from unraveling during cooking
and so that the rotisserie assembly will
rotate smoothly.
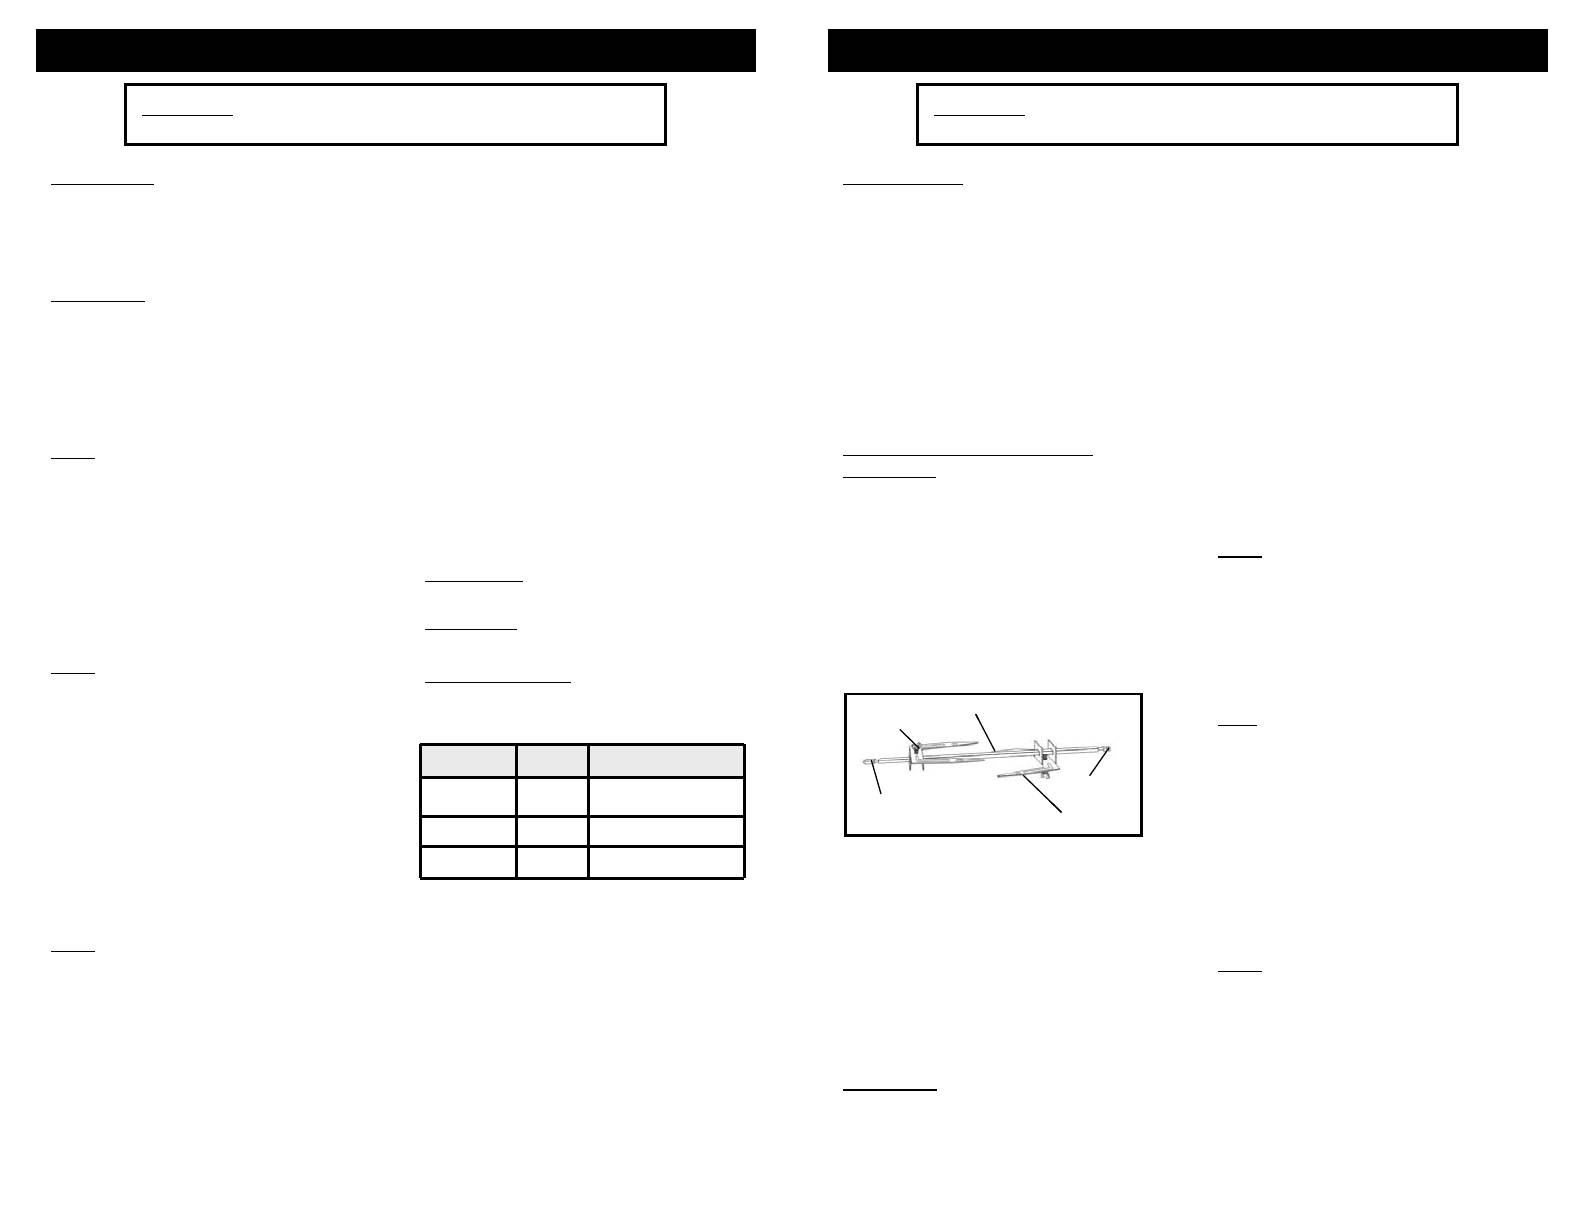
Assembling the Rotisserie
Assembly
1. Insert the pointed end of the
rotisserie skewer through the
rotisserie rod, making sure the
points of the rotisserie skewer face
in the same direction as the
pointed end of the rotisserie rod.
Slide rotisserie skewer towards the
square end of the rotisserie rod
and secure with the thumbscrew.
(Fig. 1)
Operating Instructions
Fig. 1
Rotisserie rod
Rotisserie Skewer
Thumbscrew
Pointed End
Square End
Rotisserie rod
Rotisserie Skewer
Thumbscrew
Pointed End
Square End
CAUTION: DO NOT TOUCH TOP OF OVEN WHEN IN USE.
EXTREMELY HOT!
2. Insert the pointed end of the
rotisserie rod into the drive socket
located on the right hand side of
the oven wall. Make sure the
square end of the rotisserie rod
rests on the rotisserie rod support
located on the left hand side of the
oven wall.
3. Close oven door.
4. Plug oven into the electrical outlet.
The oven will beep to advise that it
is plugged in and the power light
will go on.
5. Press the “ROTISSERIE” function
button. You will notice that the
rotisserie light will go on, and the
top and bottom element lights will
go on as well.
Note: You may choose to use the
“CONVECTION” function at the same
time. To do so, press the
“CONVECTION” function button before
pressing the “START/STOP” button..
6. Adjust the timer to the desired
time, by pressing either the
increase or decrease timer button.
Note
: The time on the oven is
automatically set at 90 minutes. Press
the increase timer button to go from 90
minutes to zero minutes or, press the
decrease timer button to decrease
incrementally from 90 minutes.
7. The temperature is automatically
defaulted to start on the highest
temperature (450 °F). Adjust to
the desired temperature by
pressing either the increase or
decrease temperature button.
Note: If desired, push the “ELEMENT”
function button once to deactivate the
bottom element, or press twice to
deactivate the top element.
8. Once having set the desired time
and temperature, press the
“START/STOP” button in order to
start the rotisserie process. The
timer will begin to count down
immediately after pressing the
“START/STOP” button.
2. Secure the food to be cooked onto
the rotisserie rod by inserting the
rotisserie skewer into the food.
3. Place the second rotisserie skewer
into the other end of the roast or
poultry and secure the rotisserie
skewer with the thumbscrew.
4. Check that the food is centered
and secured to the rotisserie rod.
Operation
1. Ensure crumb tray is in place.


