


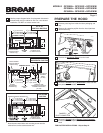

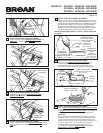
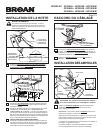

MODELS QP330BL • QP330SS • QP330WW
QP336BL • QP336SS • QP336WW
QP342BL • QP342SS • QP342WW
Page 3
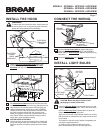
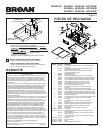
10-MINUTE DELAY OFF
When your hood fan is on (any speed) press the
button to
activate the delay off feature. When activated, the hood fan will
automatically turn off after 10-minutes has elapsed. The delay
feature is active when the following appear on the LED screen:
A green indicator illuminated above the delay
button, a nu-
meric countdown “10-0”, and a clockwise rotating LED. The delay
button can be pressed once again, to stop the delay countdown.
Pressing the
button again will resume the delay countdown.
Pressing and holding the button will turn off the feature.
TIMER
Press the
button to activate the timer setting feature. Use
the
and buttons to reduce or advance the timer setting to
the desired duration. When the desired timer setting is reached,
allow 3 seconds without pressing any additional button or press
the
button once again. The timer will then activate, and
the countdown will be displayed on the LED screen along with
an green indicator above the
button. After the timer has
reached “0:00”, an audible beep will be heard. The beep will
continue until the timer button
is pressed once again. The
timer countdown can be stopped at any time by pressing the
once again. Pressing the button again will resume
the timer countdown. Pressing and holding the
button will
turn off the feature. Note that when both the timer and delay off
features are active together, the timer function will be illuminated
on the LED display, and the delay off countdown will be active,
but not displayed.
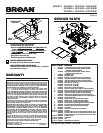
FEATURE MENU
Your hood offers many settings that can be accessed and ad-
justed by scrolling through the feature menu. Your hood fan
must be off to be able to activate and access the feature menu.
Pressing the
button when the hood fan is off will activate the
feature menu. Pressing the
button again when the feature
menu is active will scroll through the various features that can
be adjusted/set. When the feature menu is active, if a button is
not pressed within 10 seconds or after scrolling through all menu
settings, the feature menu will automatically be exited, and all
selected settings will be saved. A green indicator above the
icon will illuminate when the feature menu is active. The follow-
ing features can be adjusted sequentially:
CLOCK SETTING
Press the
button once, the “hours” will begin blinking in the
LED screen. Use the
and buttons to set the appropriate
hours for the clock. A small indicator will illuminate in the left
corner of the LED screen to designate “pm”. After the hours are
set, press the
button to advance the menu to the minute se-
lection. The minutes will begin blinking in the LED screen. Use
the
and buttons to set the minutes. Press the button
again to advance the menu to select “display” settings.
DISPLAY (default from factory - display ON)
The LED screen will display the display feature -d-. Use the
or button to toggle the LED screen on (d on) or off (doFF).
When the display off (doFF) feature is selected, the LED display
clock illumination is disabled. Press the
button again to ad-
vance the menu to select the “Sleep” setting.
SLEEP MODE (default from factory - OFF)
The LED screen will display the “Sleep” feature -S- . Use the
or button to toggle the Sleep feature on (S on) or off (S off).
When the Sleep on (S on) feature is selected, the LED screen
and fan/light LED indicators are disabled. The ambient light sen-
sor, delay-off and timer features will also be disabled. All controls
for the fan and light operation, including Heat Sentry, are still
active. Press the
button again to advance the feature menu
to select the “Ambient Light Sensor” setting. Note: To access the
feature menu when the Sleep Mode is active, press and hold the
button for 2 seconds.
AMBIENT LIGHT SENSOR (default from factory - Level 1 ON)
There are two level settings for the ambient light sensor. When
either of the two settings is active, the light sensor will detect
a low level of light in your kitchen, and will automatically turn
the task lights on the hood to the night time setting. The other
light settings are still functional. If selected when the ambient
light sensor is active, they will temporarily overide the ambient
light sensor until they are turned off. The level 1(Aon1) ambient
light sensor setting will require your kitchen to be more dark than
the level 2 (Aon2) setting before activating the night time setting.
The LED screen will display the ambient light sensor function
-A-. Use the
or button to select the light sensor setting
Aon1, Aon2, or AoFF. The Off (AoFF) setting deactivates the
automatic ambient light sensor feature so the night time light
operation is manual.
Note that the feature menu can be exited any time by not press-
ing any button(s) for 10 seconds or by scrolling through the entire
feature menu.