


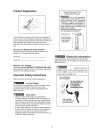

• Refer to the serial plate for correct electrical
rating. The power cord of the appliance is equipped
with a three-prong grounding plug for protection
against shock hazards. It must be plugged directly
into its own properly grounded three-prong
receptacle, protected with a 15 amp time delay fuse
or circuit breaker. The receptacle must be installed in
accordance with the local codes and ordinances.
Consult a qualified electrician. Receptacles with
Ground Fault Circuit Interrupters (GFCI) are NOT
RECOMMENDED. DO NOT USE AN EXTENSION
CORD OR AN ADAPTER PLUG.
• If the voltage varies by 10 percent or more, appliance
performance may be affected. Operating the
appliance with insufficient power can damage the
motor. Such damage is not covered under the
warranty. If you suspect your voltage is high or low,
consult your power company for testing.
• To prevent the appliance from being turned off
accidentally, do not plug the unit into an outlet
controlled by awalt switch or pull cord.
• DO NOT pinch, knot, or bend the power cord in any
manner.
Other Precautions
• NEVER unplug the appliance by pulling on the power
cord. Always grip the plug firmly and pull straight out
from the receptacle.
• To avoid electrical shock, unplug the appliance before
cleaning.
NOTE: Turning the control to "OFF" turns off the
compressor but does not disconnect power to other
electrical components.
CASTER INSTALLATION AND SET-UP
TOOLS NEEDED
You wilt need the following tools to assemble and
install the casters to the unit.
5/16", @'8"and 9/16_ Adjustable Wrench _hHilpse
Socket or Open 8rid o_PIlers Screwdriver
Wrencl_
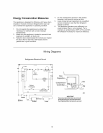
UNCRATING AND SET-UP
• Remove carton and all loose parts from inside of
the unit.
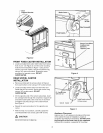
• Remove the rear access cover, place it and the
screws in a safe place for reassembly later
• Using an assistant, carefully tip the unit onto its
back and rest on blocks to avoid damaging the
condensate drain hose and the plastic raceway that
covers the evaporator tubing on the back of the
cabinet.
Using a 3/8" socket wrench remove four screws
holding the wood skid to the bottom of the unit.
Discard the wood skid and screws. See Figure 1.
Remove and discard the two front brackets with leg
leveler using a 5/16" socket wrench. See Figure 1.
Inspect the underside of the cabinet and packaging for
damage such as a fork truck can cause. If hidden
damage is found after uncrating, immediately call the
delivery carrier and request an inspection. Retain all
packaging and crating materials until the inspection is
complete.
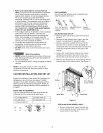
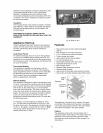
PARTS AND ACCESSORIES
Check to make sure that you have received the box
containing all of the components listed below.
A Carriage Bolt (4) D Fixed C_ster (2)
B Lock Nut (4) .......... E Hex Screw (10)
C Swivel C_ster (2)
A
Front Bracket
& Leg Leveler
F_gure t
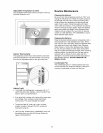
FOR GLASS DOOR MODELS ONLY-
• Remove bottom door support bracket and
screw opposite the door hinge using a 3/8"
socket wrench. See Figure 2.
3