


Page 6
INITIAL SET-UP
CAUTION - The brewer must be disconnected from the power source throughout the initial set-up, except
when specified in the instructions.
1. Insert an empty funnel into the funnel rails.
2. Place an empty dispenser under the funnel.
3. Place the heater switch at the rear of the brewer in the “OFF” lower position and connect the brewer to the
power source.
4. Fill the tank with water as directed:
4A. Model C
Pour three pitchers of tap water into the screened area on top of the brewer. Allow approximately two minutes
between pitchers for water to flow into the tank. While the third pitcher of water is entering the tank, the tank
will fill to capacity and the excess will flow from the sprayhead, out of the funnel, and into the dispenser.
4B. Models CT, CTF, CWT, CWTA, CWTB, CWTF, CWTFA, CWTFB, SINGLE CW & SINGLE CWF
Connect the brewer to the power source, place the "ON/OFF" switch in the "ON" upper position, and
momentarily press and release the start switch. Water will begin flowing into the tank. When water stops
flowing into the tank, initiate a second and a third brew cycle. During the third brew cycle the tank will fill to
its capacity and the excess will flow from the sprayhead, out of the funnel, and into the dispenser.
5. When the flow of water from the funnel stops, place the heater switch at the rear of the brewer in the “ON”
upper position and wait approximately twenty minutes for the water in the tank to heat to the proper
temperature. Some water will drip from the funnel during this time; this is due to expansion and should not
occur thereafter.
6. Empty the dispenser and initiate another brew cycle as directed:
6A. Model C
Pour one pitcher of tap water into the screened area on top of the brewer.
6B. Models CT, CTF, CWT, CWTA, CWTB, CWTF, CWTFA, CWTFB, SINGLE CW & SINGLE CWF
Place the "ON/OFF" switch in the "ON" upper position, and on models SINGLE CW and SINGLE CWF place the
batch selector switch in the "1 GAL" position. Momentarily press and release the start switch.
7. Place the "ON/OFF" switch in the lower “OFF” position after water has stopped flowing from the funnel, and
let the water in the tank reheat to the proper temperature.
8. Empty the dispenser; place the "ON/OFF" switch in the "ON" upper position, and momentarily press and release
the start switch. Check the water volume in the dispenser after water has stopped flowing from the funnel.
It should be 64 ounces for all models except SINGLE CW and SINGLE CWF should be 128 ounces.
9. Models SINGLE CW and SINGLE CWF only, place the batch selector switch in the "1/2 GAL" position, and
momentarily press and release the start switch. Check the water volume in the dispenser after water has
stopped flowing from the funnel. It should be 64 ounces.
10. If water volumes are not correct, adjust the brew timer as required. See
Adjusting Brew Volumes
. Allow the
water to reheat, start, and measure another brew cycle.
11. Repeat step 10 until correct water volume is achieved.
The brewer is now ready for use in accordance with the coffee brewing instructions on the next page.
ADJUSTING BREW VOLUMES
CAUTION - Disconnect the power source from the brewer prior to the removal of any panel for the replacement
or adjustment of any component.
NOTE: Prior to setting or modifying batch sizes, check that the brewer is connected to water supply, the tank is
properly filled, and a funnel and server are in place.
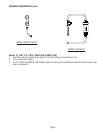
1. Modifying batch sizes. To modify a batch volume, first check that the SET/LOCK switch is in the “SET”
position on the circuit board.
10841 020503