


6
CLEANING
Refer to the decal on the rear of the dispenser door for cleaning recommendations and procedures.
The use of a damp cloth rinsed in any mild, non-abrasive, liquid detergent is recommended for cleaning all sur-
faces on Bunn-O-Matic equipment. Do NOT clean this equipment with a water jet device.
ADJUSTMENTS
The beverage solenoid is preset to dispense approximately 9/10 ounce per second (26 mL/sec). This amount
can be adjusted:
1. Disconnect the dispenser from the power source.
2. Remove the hoppers and the access panel behind the hoppers.
3. Rotate the control at the base of the solenoid clockwise to decrease or counterclockwise to increase the
amount of water.
4. Replace access panel when finished.
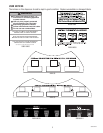
HOPPER MOTOR SPEED PROGRAMING
NOTE: The hopper dispense rates are preset at the factory. With 22 tooth gear and auger wire the preset dis-
pense rate is approximately 3 to 5 grams per second. With 30 tooth gear and auger wire the preset dispense is
approximately 5 to 7 grams per second. The hopper dispense rates can be individually programmed to a range
of dispense rates from approximately 1.5 to 12 grams per second, as follows:
1. Place the rinse/run switch in the center (program) position.
2. Hold the increase/decrease switch in the desired (increase or decrease) position.
3. While holding the increase/decrease switch, press and release the dispense switch for the chamber you wish
to adjust. Each time the dispense switch is pressed, the rinse L.E.D. will flash, and the motor speed for that
hopper will be increased/decreased by approximately 2 1/2%.
4. Return the rinse/run switch to the run position after hopper motor speed adjustments are complete.
For IMIX-3S only:
5. Once any of the three hopper motors has been programmed to the desired speed, either or both of the other
hopper motors can be set to the same speed as follows:
a. Place the rinse/run switch in the center (program) position.
b. Press and hold the dispense switch that has been programmed for the correct speed.
NOTE: Care must be taken not to exceed 5 seconds, or a hopper throw test will occur.
c. Momentarily press the dispense switch for the hopper motor to be programmed. The rinse L.E.D. will light
for approximately 1 second, indicating that the speeds have been set equal.
d. Release both dispense switches.
e. Repeat step 5. b. through 5. d. for remaining hopper motor if desired.
f. Return the rinse/run switch to the run position after hopper motor speed adjustments are complete.
DRAINING THE HOT WATER TANk
CAUTION - The dispenser must be disconnected from the power source throughout these steps.
1. Disconnect the dispenser from the power source.
2. Place the tank heater switch in the “OFF” position.
3. Shut-off and disconnect the incoming water supply.
4. Remove the front, lower access panel.
5. Pull out drain tube to empty into a sink or a container with a minimum of 7-1/2 gallon (28.5 L) capacity.
6. Make sure drain clamp is closed. Then, remove drain plug.
7. Direct tube into sink or container and open drain clamp. Continue draining tank until ALL of the water is
out.
WARNING: Be very careful with the draining water because it can be very hot.
8. Close drain clamp, insert drain plug, place drain tube back into machine, and replace lower access panel.
NOTE - The dispenser must be refilled using the INITIAL FILL & HEAT steps before reconnecting to the power
source.
36526 042806