


Page 5
INITIAL SET-UP (cont.)
4. Wait approximately twenty minutes for the water in the tank to heat to the proper temperature.
5. Place an empty server beneath the brew station. Place the Selector switch in the one-gallon position, the On/
Warmer switch in the upper position and initiate a brew cycle.
6. Place the On/Warmer switch in the lower “OFF” position after water has stopped flowing from the funnel, and
check the water volume in the server. It should be 128 ounces.
7. If not, disconnect the brewer from the power source, remove the front panel, and adjust the brew timer dial
up-or-down as required. Replace the front panel, connect the brewer to the power source, allow the water to
reheat, start, and measure another brew cycle.
8. Repeat step 7 until the proper water volume is achieved.
9. The brewer is now ready for use in accordance with the coffee brewing instructions.
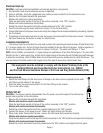
OPERATING CONTROLS
Selector Switch
Placing the switch in the
1
⁄2 Gal, 1 Gal, or 1
1
⁄2 Gal position selects the amount of coffee to be brewed in
subsequent brew cycles. Repositioning this switch after a brew cycle has been initiated does not change the brew
batch in progress.
On/Warmer Switch
Placing the switch in the unlighted lower position cuts power to the brew station warmer and stops brewing.
Stopping a brew cycle after it has been started will not stop the flow of water from the funnel. Placing the switch
in the lighted upper position supplies power to the brew station warmer and enables the brew circuit.
Start
Momentarily pressing and releasing this switch starts a brew cycle when the On/Warmer switch is in the lighted
upper position.
NOTE – The On/Warmer switch must be in the lighted upper position to initiate and complete a brew cycle.
COFFEE BREWING
1. Select the desired batch size.
2. Insert a BUNN
®
filter into the funnel.
3. Pour the proper amount of fresh coffee into the filter and level the bed of grounds by gently shaking.
4. Slide the funnel into the funnel rails.
5. Place an empty server under the funnel.
6 Place the On/Warmer switch in the lighted upper position. Momentarily press and release the start switch.
7. When brewing is completed, simply discard the grounds and filter.
CLEANING
1. The use of a damp cloth rinsed in any mild, non-abrasive, liquid detergent is recommended for cleaning all
surfaces on Bunn-O-Matic equipment.
2. Check and clean the sprayhead. The sprayhead holes must always remain open.
NOTE – In hard water areas, this may need to be done daily. It will help prevent liming problems in the brewer and
takes less than a minute.