


5
PLUMBING REQUIREMENTS
This dispenser must be connected to a cold water system with operating pressure between 20 and 90 psi (138
and 620 kPa) from a 1/2˝ or larger supply line. A shut-off valve should be installed in the line before the brewer.
Install a regulator in the line when pressure is greater than 90 psi (620 kPa) to reduce it to 50 psi (345 kPa). The
water inlet fitting is .75-11.5 NH (HOSE THREAD). For convenience an elbow adaptor is provided to convert to
a 1/4˝ flare fitting. Bunn-O-Matic does not recommend the use of a reverse-osmosis or deionized water supply
to this equipment. REQUIRED: 1.0 gpm (3.78 lpm) flow rate from water supply line.
NOTE - At least 18 inches of an FDA approved flexible beverage tubing, such as reinforced braided polyethylene
or silicone, before the dispenser will facilitate movement to clean the countertop. Bunn-O-Matic does not recom-
mend the use of a saddle valve to install the dispenser. The size and shape of the hole made in the supply line
by this type of device may restrict water flow.
29215 010413
INITIAL FILL & HEAT
CAUTION - The dispenser must be disconnected from the power source throughout the initial fill & heat, except
when specified in the instructions.
1. Turn on the water supply and connect the dispenser to the power source.
2. Water will automatically flow into the tank to the proper level and then shut-off. This will take less than five
minutes.
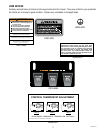
3. When the tank is full of water, open the front door and place the heater switch in the “ON” (lower) position.
A tank full of cold water will take approximately forty minutes for the water to heat on 120 volt versions, and
twenty minutes on 120/240, and 220-240 volt versions.
During this waiting period, complete these dispenser set-up steps:
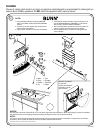
a. Place a set of keyholes in the splash panel over the screws beneath the hopper access door and push down
gently.
b. Place the drip tray onto the supports on the splash panel. Hook the tabs on the rear of the drip tray through
the holes in the splash panel. Set the drip tray cover in place.
c. Fill the hopper(s) with the dry product to be dispensed.
PLUMBING HOOK-UP (Early Models)
1. Securely attach the short piece of tubing on the water strainer assembly to the inlet fitting on the bottom of
the dispenser.
2. Flush the water line and securely attach it to the flare fitting on the water strainer assembly.
3. Turn-on the water supply.
PLUMBING HOOK-UP (Late Models)
1. Flush the water line and securely attach it to the elbow fitting on the bottom of the dispenser.
2. Turn-on the water supply.
NOTE - Water pipe connections and fixtures directly connected to a potable water supply shall be sized, installed
and maintained in accordance with federal, state and local codes.
As directed in the International Plumbing Code of the International Code Council and the Food Code
Manual of the Food and Drug Administration (FDA), this equipment must be installed with adequate
backflow prevention to comply with federal, state and local codes. For models installed outside the
U.S.A., you must comply with the applicable Plumbing /Sanitation Code for your area.
PRESET TANK TEMPERATURE
Tank temperatures have been preset at the factory to 180°F (82°C). Bunn recommends that to provide the best
quality beverage, the installer adjust the tank temperature to the powder product manufacturer’s recommended
temperature for the hot powder product being used.