4
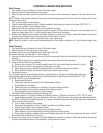
1. Remove dispenser from the box and place on a sturdy, level counter.
2. Remove the brass cap and any packing material from the end of the water inlet fitting located on the rear of
the dispenser.
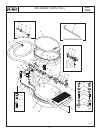
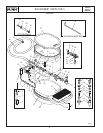
3. Attach the 1/4" "L" tube and water strainer to the water inlet fitting, tighten all flare nuts.
NOTE: The flow direction arrow on the strainer must point towards the dispenser.
4. Attach a 1/4" water line to the water strainer. This supply line must have at least 30 psi of pressure.
5. Using a screwdriver, turn the adjustment screw clockwise until the screw contacts the seat (DO NOT OVER-
TIGHTEN THIS SCREW!).
6. Turn on the water supply and open the water inlet valve on the rear of the dispenser and check for leaks in
the system.
7. Place a container under faucet(s); fully open the faucet(s) for approximately 10 seconds to remove all the air
out of the lines, then close the faucet(s). Discard the water.
8. Connect the proper BIB (Bag in a Box) adapter(s) to the concentrate inlet tube(s) and clamp. If bottle con-
centrate is used, connect the stainless formed tube(s) to the inlet hose(s) and clamp.
9. Attach the connector(s) to the BIB, or insert the bottle adapter into the bottle(s).
10. Place the concentrate container(s) in the location they will be used for normal operations.
a. In the dispenser housing: Coil the tube in the dispenser and place the BIB (bottle) on top of the coiled
tubing with the connector facing down, under the bag.
b. Under the counter: Place the BIB under the counter and rout the tubing to the dispenser, avoiding sharp
bends and kinks. Cut off excess tubing to keep the over length of tubing to minimum.
NOTE: It is critical that the dispenser is upright and the concentrate container(s) be in the proper location and
orientation that they will be during normal operation, before making any strength adjustments.
11. Slide the dispenser to the edge of the counter to gain access to the adjustment screw from the bottom.
12. Turn the adjustment screw approximately 1/2 turn counterclockwise.
13. Place a container under the faucet(s) and open faucet(s) until the entire concentrate line(s) fill and tea is
dispensed for approximately 5 seconds. Close the faucet(s). Discard this solution.
14. Place a glass under the faucet and open to fill the glass. Adjust the screw to achieve the desired strength
of tea. To increase the amount of concentrate (stronger tea), turn the adjustment screw counterclockwise
slightly (1/16 to 1/8 of a turn at a time). To reduce the amount of concentrate (weaker tea), turn the adjust-
ment screw clockwise slightly (1/16 to 1/8 of a turn at a time).
15. Dispense a couple of 8 ounce glasses of tea after each adjustment and test for taste or color. Continue this
process until the taste or color profile is achieved.
NOTE: The ratio adjustment setting is very sensitive. Make very small adjustments with the screw, then taste or
color check the results. You do not have to turn the screw very much to change the ratio.
16. Once the desired ratio of concentrate to water has been set, slide the dispenser back to the desired location
on the counter top. For under counter BIB’s, make sure the tubes do not get kinked, when the dispenser is
slid back into place.
The dispenser is now ready for use.
SET UP AND OPERATING PROCEDURES
34106.1 100506


