


6
NOTE: There will be slightly less coffee in your travel mug than the amount of
water added, as the ground coffee will absorb some of the water.
IMPORTANT: Once the Brew button is pushed, the unit must run its cycle.
You may use the power switch on the side of the machine to turn the unit OFF,
but the unit will remain in the BREW position until the internal switch is reset.
Take note to fill the water reservoir prior to turning the machine back ON and
place travel mug on mug rest as the unit will start brewing if turned off before
internal switch is reset.
CAUTION: Be careful when opening the coffee maker lid after brewing as this
area will be hot and steam built up in the machine can cause burns. Use the
lift tab located on the front of the lid and be careful with hands and face so it
does not come in contact with any steam or hot water.
Tip: Your coffee maker can also be used to brew hot water for other hot
beverages such as tea, hot chocolate, instant oatmeal and soups. To brew hot
water and avoid coffee flavor, remove the permanent filter and basket and
follow the brewing process (without adding ground coffee).
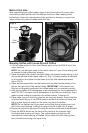
Brewing Coffee with Soft Pods
1. Lift the coffee maker lid. Pour cold filtered water up to the MAX fill line in the
water reservoir.
NOTE: You can add less water to the water reservoir if you will be adding milk
or creamer to the coffee after brewing.
2. Remove permanent filter. Place soft pod (7 g) in the bottom of the removable
filter basket; you can use 2 soft pods for a stronger flavor.
3. Place the filter basket with coffee pod into the coffee maker as instructed in
steps 2 and 3 in BREWING COFFEE WITH LOOSE GROUND COFFEE.
Close the lid.
4. Place travel mug with the lid in place on the mug rest directly. Ensure that the
lid of the travel mug is in the OPEN position so that the coffee can travel into
the mug and does not collect on the travel mug lid and overflow.
NOTE: Do not tighten the lid too much as the heat during brewing can lock
the lid into place making it difficult to remove the lid to add milk or sugar.
5. Ensure the machine is powered ON using the switch on the side of the machine.
6. Press the BREW button on the front of the machine; the indicator light
illuminates and brewing will begin. The coffee maker and light turn off
automatically when brewing is finished. Allow coffee to finish dripping from
the unit before removing your travel mug.
NOTE: There will be slightly less coffee in your travel mug than the amount of
water added, as the ground coffee will absorb some of the water.
IMPORTANT: Once the Brew button is pushed, the unit must run its cycle.
You may use the power switch on the side of the machine to turn the unit OFF,
but the unit will remain in the BREW position until the internal switch is reset.
Take note to fill the water reservoir prior to turning the machine back ON and
place travel mug on mug rest as the unit will start brewing if turned off before
internal switch is reset.
CAUTION: Be careful when opening the cover after brewing as this area will
be hot and steam built up in the machine can cause burns. Use the lift tab
located on the front of the cover and be careful with hands and face so it
does not come in contact with any steam or hot water.