


76
IMPORTANT:
The programmable timer will NOT automatically brew the next day if left in the “AUTO”
position after its last use. This is to prevent unanticipated operation. If the “AUTO OFF”
light in the lower right hand corner of the clock display is illuminated, reset “AUTO BREW”
by sliding the control switch to “OFF” and then to “AUTO.”
BREWING
If the clock display is flashing, refer to section (setting the clock) before continuing.
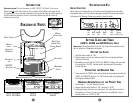
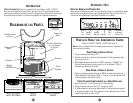
1. Open the swing-out brew basket to your right. Insert a MR. COFFEE
®
filter into
the brew basket.
2. Add desired amount of coffee, referring to the Coffee Measurement Chart.
Shake lightly to level coffee.
3. Be sure the paper filter is centered before closing the swing-out basket.
4. Fill the decanter with cold water to desired capacity as marked on the side of the
decanter. (1 cup = 5 oz).
5. Pour the water into the water reservoir. N
OTE: For easy and accurate filling, refer to
cup markings inside the reservoir. Place the empty decanter onto the warming plate.
6. Turn your Coffeemaker to “ON”. When the coffee stops flowing, the brewing cycle
is complete.
7. After the unit has cooled, remove the paper filter, then discard the used grounds
and filter.
N
OTE: The filter basket can be removed by swinging it open to the right, lifting the basket
up and pulling the bottom of the basket out. Rinse the basket and replace by inserting
the top post of the basket into the machine first.
W
ARNING: To avoid risk of personal injury or damage to property as a result of overflow,
be sure the decanter is squarely centered under the brew basket during the brewing cycle.
Brewed coffee and grounds, both in brew basket and decanter, are very hot. Handle with care
to avoid scalding. If brew basket overflows, or if brew basket fails to drain into decanter
during brew cycle, do not open or handle basket. Unplug Coffeemaker and wait for contents
to cool before handling.
A
UTOMATIC
B
REWING
P
AUSE
‘
N
S
ERVE
Our Brewing Pause ‘n Serve feature allows you up to 30 SECONDS to pour a cup while
the coffee is still brewing. It also prevents any remaining coffee in the brew basket from
dripping onto the warmer plate once brew cycle is complete.
W
ARNING: To prevent injury from hot overflow, replace decanter within 30 seconds if
removed during brewing. If the decanter is not replaced within 30 seconds,
the filter basket will fill with water and overflow.
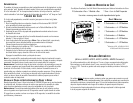
C
OFFEE
M
EASUREMENT
C
HART
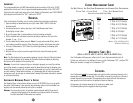
FOR BEST RESULTS, USE DRIP GRIND RECOMMENDED FOR AUTOMATIC DRIP COFFEEMAKERS.
2 L
EVEL TBSP. = 1 LEVEL SCOOP 1 CUP = 5 OZ. BREWED COFFEE
Use more or less coffee to suit taste.
CUPS GROUND COFFEE
12* 11 Tbsp. or 5-1/2 Scoops
10 9 Tbsp. or 4-1/2 Scoops
8 7 Tbsp. or 3-1/2 Scoops
6 6 Tbsp. or 3 Scoops
4 5 Tbsp. or 2-1/2 Scoops
2 3 Tbsp. or 1-1/2 Scoops
*Models AD12, AD12BLK, ADS12,
ADX20 and ADX23 only
AUTOMATIC SHUT-OFF
(MODELS
ADS10, ADS12, ADX13, ADX20 & ADX23 ONLY)
Your Coffeemaker will keep your coffee hot for 2 hours, then automatically shut off.
To keep
your coffee hot for an additional 2 hours, turn the Coffeemaker “OFF” and then “ON”.
When your decanter is empty, turn Coffeemaker
“OFF”
.
CLEANING
Your Coffeemaker
must
be cleaned when you begin to notice excessive steaming or the
brewing time increases considerably. This condition is caused by a build-up of lime and
mineral deposits from your water. If the pumping action stops before all the water has
been pumped out of the machine, the appliance requires cleaning.
The frequency of cleaning depends on the hardness of water used.
The following table gives a suggested cleaning schedule.