


Light is on, the machine monitors
time and the number of brewings.
The green charcoal filter light will
start blinking either after 6 weeks or
after the Coffee Brewing Button has
been turned on 60 times whichever
comes first, reminding you to replace
the cartridge.
If you make coffee once a day, the
filter light will start flashing after 6
weeks. If you make coffee twice a
day, the light will flash after 30 days.
This will help you to plan the right
amount of cartridges.
Attention: When you unplug the
machine for more than 10 seconds or
if you have a power failure, the
electronic indicator loses its memory.
Then it is best to replace the filter 6
weeks after first use.
Caution: Once the cartridge is activated
you should never use it for longer
than six weeks. Harmful bacteria
build-up may occur. Unused
cartridges can be stored indefinitely.
Replacement cartridges are available
through your local Capresso dealer or
by using the enclosed mail order form
or through the website:
www.capresso.com.
3b. Replacing the Cartridge /
Resetting the Filter Indicator
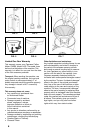
Remove the cartridge from the water
container (Fig. 3), twist and open the
holder and discard the old cartridge.
Replace with new cartridge (Fig. 4)
and close the filter holder securely.
Insert the assembly back into the
water tank (Fig. 3) and make sure it is
inserted properly otherwise the water
container lid will not close completely.
Activate the charcoal filter (chapter 3a).
While the green light is still blinking,
push and hold the Charcoal Filter
Button for a few seconds until the
light stops blinking and is illuminated.
The indicator starts counting again.
4. The Proper Sequence for Making
Coffee
Coffee makers produce very hot water.
If you follow the sequence as described
below you will avoid possible accidents
which might cause severe injuries and
burns.
1. Remove carafe from machine.
2. Remove the water container and
fill with the desired amount of
water. Do not fill above the MAX
setting. Replace the water
container and make sure it sits
firmly in place.
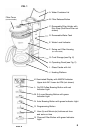
3. Push the Filter Release button
(Fig 1, B) so that the filter holder
housing swings to the right. Make
sure the filter holder insert sit firmly
in place with the handle pushed
down.
Caution: When you push against
the drip stop from the bottom, and
the filter holder lifts up, re-insert the
filter holder. Otherwise the drip stop
will not open during brewing. Hot
water could overflow from the filter
causing injuries.
4. Insert filter paper (chapter 5b)
or a GoldTone Filter (chapter 5a).
5. Add the correct amount of ground
coffee (chapter 5c).
6. Swing the filter holder back into
the machine. Make sure it engages
under the Filter Cover (Fig. 1).
7. Make sure the lid sits properly on
the glass carafe. Insert the carafe
into the machine. The inner part of
the lid pushes the drip stop up, to
let coffee brew through.
8. Turn the machine on (Fig. 2, L).
9. Never push the Filter Release
Button during brewing. Hot water
could spill out causing burns.
Wait until the brewing noise stops.
10. Immediately after brewing is finished
there could still be hot water in
the filter holder passing through
the ground coffee. This can take
1 to 3 minutes depending on how
8