


8
When installing the new filter(s), note the direction of the airflow
arrows on the filter frame, which should be pointing at the indoor
coil.
3. Reinstall filter access panel ensuring opening is air and
watertight.
If you have difficulty locating your air filter(s) or have questions
concerning proper filter maintenance, contact your dealer for
instructions. When replacing filters, always use the s ame s ize and
type of filter that was supplied originally by the installer.
Replacing or inspecting filters in units with
economizers
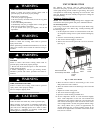
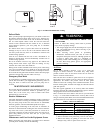
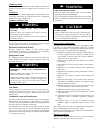
Small Chassis (See Fig. 9)
1. Remove return air duct cover at rear of unit using a 5/16--in.
nut driver.
2. Remove the filter(s) by pulling it out and through the unit
duct opening. If filter is dirty , replace both filters with new
ones.
When installing the new f ilters, note the direction of the airflow
arrows on the filter frame, which should be pointing at the indoor
coil.
3. Reinstall duct cover ensuring opening is air and watertight.
Table 2 – Indoor Air Filter Data with Economizer
48EZ Unit Size Filter Size in. (mm)
30-040/060
2each20x12x1
(508 x 305 x 25)
36-060/090
2each20x12x1
(508 x 305 x 25)
42-060/090
1 each 24 x 14 x 1 (610 x 356 x 25),
24 x 16 x 1 (610 x 406 x 25)
48-090/115/130
1 each 24 x 14 x 1 (610 x 356 x 25),
24 x 16 x 1 (610 x 406 x 25)
60-090/115/130*
1 each 24 x 16 x 1 (610 x 406 x 25),
24 x 18 x 1 (610 x 457 x 25)
*Units with bent indoor coil.
48VT Unit Size Filter Size in. (mm)
30-040/060
2each20x12x1
(508 x 305 x 25 mm)
36-060/090
1 each 24 x 14 x 1 (610 x 406 x 25),
24 x 16 x 1 (610 x 406 x 25)
42-060/090
1 each 24 x 14 x 1 (610 x 356 x 25),
24 x 16 x 1 (610 x 406 x 25)
48-090/115/130*
1 each 24 x 16 x 1 (610 x 406 x 25),
24 x 18 x 1 (610 x 457 x 25)
60-090/115/130*
1 each 24 x 16 x 1 (610 x 406 x 25),
24 x 18 x 1 (610 x 457 x 25)
*Units with bent indoor coil.
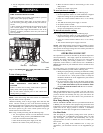
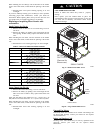
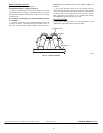
Large Chassis (See Fig. 10)
1. Remove filter access door using a 5/16--in. nut driver.
2. Remove the filter(s) by pulling it out and through the unit
filter access door. If filter is dirty , replace both filters with
new ones.
Units with bent indoor coils, install 24 x 18 x 1 (610 x 457 x 25
mm) filter first and then install 24 x 16x1(610x406x25)filter.
When installing the new f ilters, note the direction of the airflow
arrows on the filter frame, which should be pointing at the indoor
coil.
3. Reinstall filter access door ensuring opening is air and
watertight.
UNIT OPERATION HAZARD
Failure to follow this caution may result in property
damage.
Never operate your unit without filters in place. An
accumulation of dust and lint on internal parts of your unit
can cause loss of efficiency and blower motor and/or
compressor damage.
!
CAUTION
RETURN
DUCT COVER
(Remove for
lter access)
SMALL CHASSIS
A10063
Fig. 9 -- Small Chassis Filter Access
LARGE CHASSIS
FILTER
ACCESS
PANEL
A10062
Fig. 10 -- Large Chassis Filter Access
Fans and Fan Motors
Periodically check the condition of fan wheels and housings and
fan motor shaft bearings. Contact your dealer for the required
annual maintenance.
Indoor and Outdoor Coils
Cleaning of the coils should only be done by qualified service
personnel. Contact your dealer for the required annual
maintenance.