


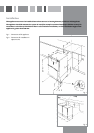


Installing under a worktop
• Adjust the feet to the required height.
• Push the appliance into the niche until the decor door
is flush with the adjacent furniture items, adjust the
feet if necessary.
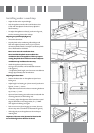
• Pre-adjust the appliance at slots (4) as shown in figure 8,
into the mounting plate on the worktop.
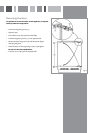
Adjusting the plinth depth (figure 6)
• Lift out the decor door.
• Grip the plinth at the ventilation grille and align until
flush with adjacent furniture items, or join up to the
continuous plinth if fitted. Cut away the continuous plinth
trim as illustrated for ventilation.
Never cover over the ventilation slots.
Once installed the plinth must not block the
ventilation slots in the appliance. This may require
cutting the plinth down. Failure to ensure adequate
ventilation may invalidate the warranty.
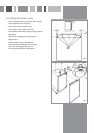
• Attach the appliance plinth at screws (5),
turning screws clockwise until considerable resistance
is felt (figure 7).
• To adjust the plinth height, turn the screws anti-clockwise
through approximately 8 to 10 revolutions.
Adjusting the decor door
• Position the decor door on the appliance. Open loose
locking nuts.
• Adjust height Y at locating pin (14mm wrench) as shown in
figure 8, Y=max +/- 3.5mm.
• Adjust side measurement X at slots on mounting bracket at
top, X=max, +/- 3mm.
• Open out lower locating pins until contact is made with the
mounting plate. Secure with locking nuts.
• If necessary, adjust the alignment of the lower decor panel
edge at 10x12 hole in mounting bracket, Z= +/- 2MM.
Then tighten the locking nuts again.
• Push on cover trim (6) and engage (to remove, lever out
the trim strip with a screwdriver as illustrated in figure 9).
• When aligned, secure the appliance to the worktop at
retaining slots.
Important: The cover trim (6) must be fitted as this
turns off the light when the door is closed.
4
4
4
fig. 6
fig. 7
fig. 8
fig. 9
5