


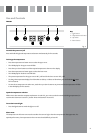
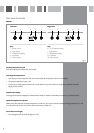
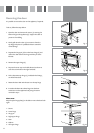


Installing the wine cooler
This appliance is intended to be installed in a space
between two units.
The minimum space required is:
FWC151 – 150 mm wide x 555 mm deep x 825 mm high
FWC301 – 300 mm wide x 580 mm deep x 825 mm high
FWC601 – 600 mm wide x 580 mm deep x 825 mm high
FWC621 – 600 mm wide x 580 mm deep x 825 mm high
Please note: When the product is installed, there should
be a small ventilation gap between the top of the unit and
the underside of the worktop (6 mm or ¼”)
These products should not be installed:
1. In direct sunlight
2. Adjacent to a heat source (oven or radiator)
3. Below a hob unit
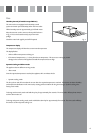
4. Where a continuous plinth is to be used, it is necessary
cut a section out so that the ventilation slots at the
front of the appliance are not obstructed in any
way fig 6.
IMPORTANT: Failure to follow the instructions regarding
installation and ventilation may invalidate the warranty
supplied with your appliance.
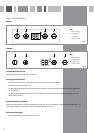
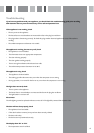
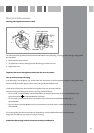
To install the handle
IMPORTANT: Do not overtighten the screws, and do not
use power tools to install the handle.
1. Carefully remove the door seal approximately 10 cm
down from the top of the wine cooler door.
2. Insert the screw from the inside of the door frame and
screw it in to the handle.
3. Replace the door seal.
Repeat steps 1 to 3 approximately 10 cm up from the bottom of
the door for the lower handle fixing
fig. 6
9