


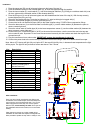
Installation:
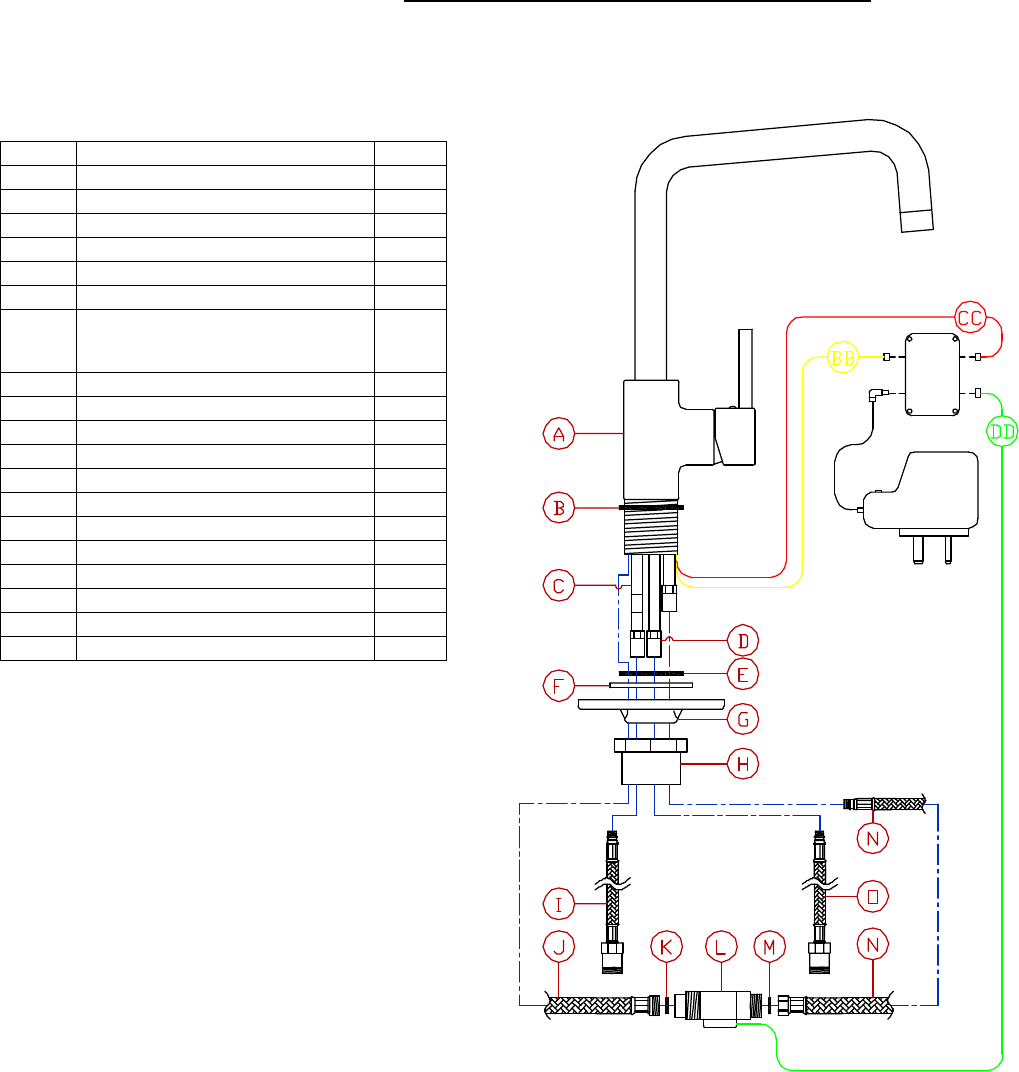
1. Pass the upper seal (B) over all wires and pipes onto the base of the tap (A).
2. Pass the threaded section of the mixertap base (A), all wires and pipes through the taphole.
3. Pass the lower washer (E), metal washer (F), and white triangular stabiliser (G) (if fitting to a stainless steel sink) over
all wires, pipes and the threaded section of the mixertap base (A).
4. Pass the fixing nut (H) over all wires and pipes onto the threaded section base of the tap (A). With the tap correctly
located tighten the fixing nut fully.
5. Screw the hot flexible tail pipe (I) into the hot inlet pipe (C). note hot inlet pipe is tagged with [c].
6. Screw the cold flexible tail pipe (O) into the cold inlet pipe (D).
7. Connect the hot & cold flexible tail pipes (I&O) to the water supplies using ½” BSPx15mm compression fittings.
8. Screw the brass sensor (L) to the mixed water out flexible pipe (J), use the rubber washer (K) between the parts to
ensure a water tight seal.
9. Screw the mixed water in flexible pipe (N) to the brass temperature sensor (L) use the rubber washer (M) between the
parts to ensure a water tight seal.
10. Connect the input / output wires (BB,CC & DD) to the control box as shown, note the control box and wire tags are
colour coded in pairs. Important: Do not force the connectors incorrectly into the sockets and check the layout of the
connections now.
11. Plug the transformer into a mains outlet; IMPORTANT: ensure the transformer is set to 9V.
12. Connect the power lead to the control box (P), secure the control box using a cable tie or double sided foam tape.
Note: Above 45°C the tap will light fully red, below 20°C the tap will light fully blue, in between these temperatures the light
will be purple. The light will only activate at a flow rate above 1 litre / minute.
Key: Description: Qty
A Mixertap body 1
B Upper seal 1
C Hot water inlet pipe 1
D Cold water inlet pipe 1
E Lower washer 1
F Metal washer 1
G
White triangular stabilizer
(use only if installing tap to
stainless steel sink)
1
H Fixing nut 1
I Hot flexible tail pipe 1
J Mixed water in flexible pipe 1
K Rubber washer 1
L Brass sensor 1
M Rubber washer 1
N Mixed water out flexible pipe 1
O Cold flexible tail pipe 1
Mains Transformer 1
BB black wire, yellow tag
CC Grey wire, red tag
DD Black wire, green tag
After installation:
Once you have visually checked the new fittings and
connections, ensure that all taps are closed except the
new mixer tap, which should be left open. Turn on the
water supply at the mains stop cock. As the system
starts to refill, check carefully for leaks. Once you are
fully satisfied that there are no leaks, turn on the water
heating.
Clean the tap to remove any marks created during
installation as instructed then replace the bag that has
been provided to protect the tap until it is ready for use.
C
DP
CB