


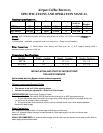
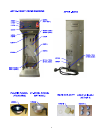


Electrical Connection:
APT18 - 120 volt, 1.8 kw - Brewers require a single use (dedicated) 15 amp grounded receptacle.
APT100 – 120/240 volt, 6.4 kw - Brewers require a single use (dedicated) 30 amp twist lock
grounded receptacle.
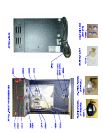
TANK PRIMING PROCEDURES
THESE INSTRUCTIONS ARE FOR INITIAL PRIMING ONLY AND DO NOT HAVE TO BE
REPEATED FOR NORMAL OPERATION.
NOTE: The Heater toggle switch, located in back of unit, or under the top cover, must be in the
OFF POSITION.
1. Remove sample filter pack from brew funnel and insert brew funnel back into machine.
2. Place an empty Air Pot directly under brew funnel.
3. Plug the power cord into a proper receptacle.
4. Activate the RED Power Switch. The tank will start filling automatically. Allow approximately 4-5 minutes
for the tank to fill.
5. After the water tank is filled, activate the Heater Switch ON POSITION
. Allow approximately 15-20
minutes for the water to reach a brew temperature (197°F). The heat up time will depend on the water inlet
temperature, the input voltage and the wattage of the elements in the machine.
When the (Green) Ready Light comes on the machine is ready to start brewing.
6. Press Brew Button:
BREWING INSTRUCTIONS FOR COFFEE
1. Place a paper filter into brew funnel and add 2.5 oz. of fresh ground coffee into the filter. Place the funnel back
into brew head of machine.
2. Unlock the Air Pot Cover and remove the Pump Assembly from the Air Pot.
3. Place the Air Pot with cover open on the support shelf under the funnel.
4. When the Green READY light inside the Brew Switch comes on, depress the Brew Switch.
Note: Allow 5 to 6 minutes for the complete brew cycle. DO NOT remove funnel from the brewer until it
has completely stopped dripping
6. Remove AIR POT from the brewer, insert the air pump tube, and snap the top closed.
7. Serve fresh brewed coffee from dispenser nozzle by pushing down the round large button on top of the cover.
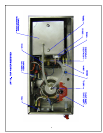
ADJUSTMENTS:
Timer Adjustments (To adjust total volume of COFFEE)
1. Turn the Power Switch to OFF and remove the top cover.
2. Locate BREW TIMER and adjust as follows:
3. For MORE volume, turn TIMER KNOB CLOCKWISE.
4. For LESS volume, turn TIMER KNOB COUNTERCLOCKWISE.
5. Go through a complete brew cycle and repeat adjustments if necessary.
CAUTION: Turn TIMER KNOB only in SMALL increments at a time.
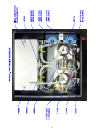
Thermostat Adjustments
Thermostat is factory set for proper operating temperature of 197°F to 203°F with the adjustment Knob set to the
maximum clockwise position. If field adjustments are needed proceed as follows:
To DECREASE temperature, turn the control shaft slightly to the left COUNTERCLOCKWISE.
To INCREASE temperature, proceed as follows: With the control knob ALREADY TURNED TO ITS MAXIMUM
CLOCKWISE POSITION, locate the small, slotted ADJUSTMENT SCREW inside the hollow shaft. By using a
narrow blade screwdriver engage the slotted adjustment screw and turn it an 1/8 of a turn slowly to the left
(counterclockwise) until a click is heard and the Green Ready Light goes OFF.
NOTE: Measure the water temperature at the head with the spray head removed in order to capture a solid
stream of hot water. Be sure to REPLACE spray head afterwards.
In HIGH ALTITUDE locations, (5000 ft. above sea level) the thermostat setting will have to be lowered to
prevent boiling.
3