


7
Procedure: Heat the waffle plates fully and wait for the “Ready for Baking” green light to
come on. Open the lid and carefully add 1 to 2 tablespoons of water to the center of the
lower waffle plate. Caution: This will create steam! Immediately close the lid so that
both the upper and lower plates are treated simultaneously and wait for the water to
steam off completely.
Note: Adding water will likely automatically trigger the countdown mechanism. In any event, be sure to close
the lid immediately to confine the steam, let the timer count down and wait for the “Ready for Baking”
green light to come on before adding batter.
6. The “Taste Select” is set at the factory for “Crispy Exterior, Moist Interior” as the adjacent
red light indicates. If you prefer to bake a waffle that is crunchier all the way through, push
the “Taste Select” button. The red light next to “Uniform Texture” will light and the time
displayed will be either the factory default of “4:15” or the time-setting you selected when
you last baked with a setting of “Uniform Texture”. The “Uniform Texture” uses a reduced
power level for a slower bake waffle. Note: The factory settings of bake-time are “2:00” (Two
minutes) for ”Crispy Exterior, Moist Interior”, which is a fast bake and “4:15” (Four minutes
and fifteen seconds) for “Uniform Texture”, a slower bake.
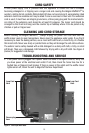
7. Carefully place 1 full cup of pre-measured batter (some recipes call for more) onto the
center of the lower baking plate, close the lid and make certain the locking latch
engages (see Fig.1). The presence of batter will be detected automatically and the
digital timer will start counting down. At the end of the baking cycle 3 short beeps will
signal that the waffle is “done”. Carefully check the doneness of the waffle by unlatching
and lightly lifting the lid. If the lid appears to be sticking or if you wish to deepen the
color, leave the lid closed for an additional 15 seconds, then lift. The lid should open
readily when the waffle is fully cooked.
Tip: Use a measuring cup to ensure accurate volume and to facilitate pouring of the batter.
8. Remove the waffle. To prevent damage to the non-stick baking surfaces, remove the waffle
with a high temperature plastic spatula or fork. Note the light and crispy nature of the freshly
baked waffle.
9. When the green “Ready to Bake” light and timer setting return, you can start the next
waffle. (Note: If you wish to bake longer on the next cycle press and hold the “▲” up button
to set the new time. To decrease the bake time press the “▼” down button. You can change
the bake time only when the green light is on.) As you continue to hold either of these
buttons the time will scroll faster. Once a waffle is baked with your new bake time, the
electronics will automatically store this new time setting for your next use.
10.If left unattended for 45 minutes the Belgian WafflePro
®
will enter the “Sleep Mode”. In the
“Sleep Mode” it’s display will show three flashing dashes “---” on the display. In the “Sleep
Mode” the WafflePro
®
no longer attempts to maintain the “Color Adjust” temperature and
the waffle plates will begin to cool. To wake up the Belgian WafflePro
®
and bake more
waffles just press any button. When a button is pressed the display will show “0:00” and
begin pre-heating to the “Color Adjust” baking temperature. If you do not wish to use the
waffle maker again that day, be certain to unplug it before leaving the room.
DO NOT place any batter in the waffle maker until the plates have fully reheated and the
green “Ready to Bake” light comes on. Otherwise the waffle batter will likely stick to the
plates, making it very difficult to remove the waffle.