


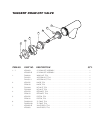
PRESSURE RELIEF
VALVE TESTING
PROCEDURE
The pressure relief valve must be
checked at least twice a year as part
of the normal maintenance performed.
1. With the kettle empty, fully open the steam valve and
allow the kettle to preheat.
2.
Stand to the side of the pressure relief valve discharge tube
and pull valve open for a maximum of one second. Repeat
test three to four times. Each time the mechanism should
move freely and be accompanied by a rapid escape of steam.
⇒
If valve appears to be sticking replace pressure relief valve.
⇒ If foreign material is discharged then drain kettle and
replace pressure relief valve.
WWAARRNNIINNGG
: Improper refilling of kettle jacket will result in
irreversible damage to unit.
STEAM TRAP
To remove line condensate that forms inside the steam
jacket, each kettle should be equipped with a steam trap in
the line of the kettle outlet to the drain. A good steam trap at
startup releases air and wet steam into the drain line for a
few minutes, then holds the steam jacket. During cooking,
the trap periodically releases accumulated condensate. If
the kettle's cooking performance becomes inadequate after
long use, replacement of the steam trap with a new one may
restore kettle operation to peak efficiency.
DRAW-OFF VALVE
To correct a leak at the draw-off valve, the source of the
leak must first be determined, Leaks from around the
valve stem are corrected by simply replacing the “O”
ring. Faulty seating of the valve stem disc against the
valve body may cause dripping from the valve even when
the valve is tightly closed. This can often be corrected by
cleaning any residue from the disc and seat
.
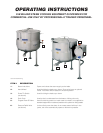
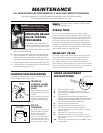
MAINTENANCE
ALL SERVICE MUST BE PERFORMED BY A QUALIFIED SERVICE TECHNICIAN.
This kettle requires very little preventative maintenance other than daily cleaning.
The pressure relief valve must be tested twice a year.
LUBRICATION PROCEDURE
Lubricate the following parts every three months to insure
smooth operation and reduce wear.
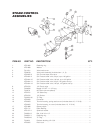
TRUNNION
HOUSING, WORM
SCREW AND TILT
GEAR
These parts are accessed
through the top cover of the
console.
Apply grease to gear teeth.
Check for excessive play
and adjust with adjusting
screw located on top of cross bar.
KETTLE
TRUNNIONS
On the left hand side of the
kettle there are two grease
nipples on the top back
portion of the trunnion
housing. On the right hand
side of the kettle you must
remove the console cover to
access the grease nipple.
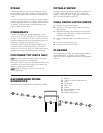
Trunnion Housing
Grease Nipple
Adjusting
Screw
Worm
Screw and
Tilt
Gear
Cross
Bar
HINGE ADJUSTMENT
INSTRUCTIONS
1. Insert 3/8" Allen wrench.
2. Turn clockwise to relieve tension on spring.
3. While tension is released remove one of the two
slotted screws.
4. To prevent Allen wrench from springing back
abruptly while the second slotted screw is removed,
insert a pin (approximately 1/8") in the hole where
the first slotted screw was removed from.
5. Remove second slotted screw.
6. While holding Allen wrench remove pin.
7. Turn Allen wrench clockwise to tighten or
counter-clockwise to loosen tension to produce
desired effect.
8. Re-insert pin in one of the two holes.
9. Tighten one slotted screw in the other hole (it
may be necessary to turn Allen wrench slightly to
align holes).
10. Remove pin and repeat step number 9. for other
slotted screw.
3/8" Allen wrench
DANGER
: Pressure relief valve will
exhaust high temperature steam. Contact
with skin could result in serious burns. Keep
face, hands and body clear of discharge.