


Operation
3. Operation
3.1. Initial Setup
3.1.1. Check…
Drain screen is in place
Spay arms and end plugs are secure
3.1.2. Chemicals
• Assure there is a sufficient supply of chemicals before beginning a shift.
3.1.3. Filling the Machine
• With the power ON, press and hold the Fill/Start switch in the “FILL” position
until the water level in the wash tank is about 1” deep, or just below the
bottom wash arm.
3.2. General
Caution: Do not operate the dishmachine without the drain screen in place. Debris
getting into the pump impeller can damage the pump.
1. Load a rack of glass into the machine and close the door.
2. With the machine filled to the proper level, press rocker Fill/Start switch to the
“START” position – the machine will automatically begin its cycle. The green running
light on the switch will illuminate while an operational cycle is in process.
3. At the end of the shift, drain the machine by holding the Drain rocker switch in the
“DRAIN” position until the machine is completely drained. To avoid running the pump
dry, do not hold the Drain rocker switch in the “DRAIN” position any longer than
necessary.
4. Remove and clean the drain screen. Remove and clean the spray arms. (See wall
chart instructions).
5. Replace the drain screen and spray arms.
3.2.1. Pre-Scrapping
It is essential that the operator thoroughly understand the importance of pre-scrapping the
glasses before loading them. The GL-X is equipped with a removable drain screen. The
drain screen can be easily removed for cleaning between Operational Cycles of the
dishmachine. Properly pre-scrapping the glasses should permit the glasswasher to
operate for an entire shift before needing to remove and clean the drain screen.
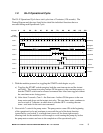
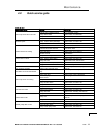
3.2.2. Proper Chemical Dosage
The amount of chemical delivered, whether it is detergent, sanitizer or rinse aid, is
determined by its respective cam on the cam timer.
• Cam number 2 runs the detergent pump
• Cam number 5 runs the sanitizer pump
• Cam number 6 runs the rinse aid pump
MODEL GL-X INSTALLATION & OPERATION MANUAL Rev. 1.01 –08/04/05 PAGE
8