


DETACHABLE CORD/FIXED CORD KETTLE
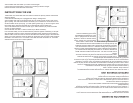
1.Placekettleonadry,atsurface.
2.Connectthecordsetintothesocketonthekettlejustbelowthehandle.(fordetachable
cord kettle only) (Fig. 4)
3. Insert the plug into the power outlet and switch on.
4. The appliance is switched on by setting the on/off switch into the “up” position. The pilot
Light Hill come on (Fig. 5).
5. When the water has boiled, the kettle will switch off automatically. After allowing the kettle
tocooldownfor15-20seconds,thewatercanbebroughtbacktotheboilbypushingthe
switch back to the “up” position. During the cooling down time do not force the on/off switch
into the “up” (“ON”) position as this can damage the operating mechanism.
6. The kettle may be switched off at any time by either pushing the switch of the kettle to the
“down” position or by switching off the power at the power point.
8. To pour water from the kettle, turn the power off at the power outlet and remove the cord-
set from the power outlet and the kettle (Fig 7.).
CORDLESS KETTLE
1.Placethepowerbaseonadry,atsurface.
2.Place the kettle on the power base. The electrical connections will be made automatically
as the kettle slides onto the power base.
3.Plug the cord set into an earthed power socket and switch on by depressing the switch on
the kettle to the “up” position.
4.When the water has boiled, the kettle will switch off automatically. After allowing the kettle
tocooldownfor15-20seconds,thewatercanbebroughtbacktotheboilbypushingthe
switch back to the “up” position. During the cooling down time do not force the on/off switch
into the “up” (“ON”) position as this can damage the operating mechanism.
5.Donotremovethekettlefromthepowerbasewithoutrstswitchingoff.
6.Remember,ifyoudonotwishtore-boilthekettle,turnitoffatthepowerpoint.
7.The kettle may be switch off at any time by either pushing the switch off at the power
outlet.
8.To pour water, lift the kettle form the power base and pour.
HOW TO CARE FOR YOUR KETTLE
Wipe the exterior of the kettle with a soft, damp cloth or sponge. Remove stubborn spots
with a cloth moistened with mild liquid detergent. Do not use abrasive scouring pads or
powders. Never immerse the kettle in water or other liquids.
From time to time, depending on the nature of your water supply, a limescale deposit is
naturally formed and can be found mostly adhered to the heating element and reduce the
heating capacity. The amount of limescale deposited and (subsequently the need to clean
or descale) largely depends on the water hardness in your area and the frequency with
which the kettle is used.
Limescale is not harmful to your health. But if poured into your beverage it can give a pow-
dery taste to your drink. Therefore, the kettle should be descaled periodically as indicated
below:
DESCALING
Descale the kettle regularly. With normal use: at least twice a year
1.Fill the kettle up to “MAX” with a mixture of one part ordinary vinegar and two parts of
water. Switch on and wait for the appliance to switch off automatically.
2.Let the mixture remain inside the kettle overnight.
3.Throw the mixture away the next morning.
CORDÓN ACOPLABLE / HERVIDOR CON CORDÓN
FIJO
1.Coloqueelhervidorsobreunasuperciesecayplana.
2.Conecteelcordónalaentradaenelhervidorjustodebajodelmango(enelcasodehervi-
dor es de cordón acoplar el solamente) Figura 4.
3.Inserte el enchufe al tomar corriente y proceda a encender.
4.El aparato se enciende colocando el botón de encendido en la posición “up” (hacia arriba).
La luz del piloto se iluminará. (Figura 5).
5.Una vez que el agua haya hervido, el hervidor se apagará automáticamente. Después de
dejarqueelhervidorseenfríeduranteunos15a20segundos,sepuedehervirelaguade
nuevo colocando el botón de encendido en la posición “up”. Durante el tiempo de enfria-
miento del aparato, no fuerce el botón de encendido a la posición de “up” (de encendido) ya
que esto puede dañar el mecanismo de funcionamiento.
6.Se puede apagar el hervidor en cualquier momento colocando el botón de encendido en
laposición“down”(haciaabajo)odesconectandoelaparatodeltomacorriente.
7.Recuerde que si no se desea volver a hervir el agua en el hervidor, es necesario desco-
nectarlo del tomacorriente.
8.Para verter el agua del hervidor, desconecte el aparato del tomacorriente y retire el cordón
del hervidor (Figura 6).
HERVIDOR SIN CORDÓN
1.Coloquelabasesobreunasuperciesecayplana.
2.Coloque el hervidor sobre la base (Figura 3). La conexión eléctrica se efectuará automáti-
camente al momento de colocar el hervidor sobre la base.
3.Conecte el cordón a un tomacorriente con conexión a tierra y encienda el hervidor colo-
cando el botón de encendido en la posición “up”.
4.Una vez que el agua haya hervido, el hervidor se apagará automáticamente. Después de
dejarqueelhervidorseenfríeduranteunos15a20segundos,sepuedehervirelaguade
nuevo colocando el botón de encendido en la posición “up”. Durante el tiempo de enfria-
miento del aparato, no fuerce el botón de encendido a la posición de “up” (de encendido) ya
que esto puede dañar el mecanismo de funcionamiento.
5.No retire el hervidor de la base sin primero haberlo apagado.
6.Recuerde que si no se desea volver a hervir el agua en el hervidor, es necesario desco-
nectarlo del tomacorriente.
7.Se puede apagar el hervidor en cualquier momento colocando el botón de encendido en
laposición“down”(haciaabajo)odesconectandoelaparatodeltomacorriente.
8.Para verter el agua del hervidor, desconecte el aparato del tomacorriente y retire el cordón
del hervidor (Figura 6).
MANTENIMIENTO DEL HERVIDOR
Limpieelexteriordelhervidorconunpañoounaesponjasuaveyhúmeda.Retirelas
manchasconunpañohumedecidocondetergentelíquidosuave.Noutiliceesponjaspara
refregarnipolvoparalimpiar.Nuncasumerjaelhervidorenaguauotroslíquidos.
De vez en cuando, dependiendo de la naturaleza de su suministro de agua, se puede
formar un depósito de sarro de manera natural que se adhiere al elemento de calentamiento
y reduce la capacidad de calentamiento. La cantidad de sarro depositado (y consecuent-
emente la necesidad de limpiarlo o eliminarlo) depende en gran parte de la dureza del agua
de su localidad y la frecuencia con la que se utilice el hervidor.
Estos depósitos no son dañinos para su salud, pero si se vierte una bebida le pueden dar
un sabor terroso. Por lo tanto, el hervidor debe limpiarse de manera periódica como se
indicamásabajo.
2
2