


cuidado para retirar el polvo que se pueda haber acumulado. Seque con una toalla seca. No
utilice limpiadores ásperos y abrasivos.
Retire las etiquetas o calcomanías.
¡ADVERTENCIA! No sumerja el cordón, el enchufe o el conector de electricidad en
agua o cualquier otro líquido. No sumerja la plancha freidora en agua.
FUNCIONAMIENTO
•Siempre coloque el electrodoméstico sobre una supercie nivelada, no resbalosa y estable.
•Siempre coloque el electrodoméstico sobre una supercie resistente al calor, ya que el
aparato alcanza altas temperaturas.
•¡ADVERTENCIA! No deje el electrodoméstico encendido si se lo deja solo.
•¡ADVERTENCIA! Siempre deje un espacio de aproximadamente 20 cm. alrededor del exterior
del electrodoméstico cuando se encuentre funcionando. Nunca lo utilice cerca de cortinas,
debajo de alacenas o cerca de paredes o de cualquier otro material inamable.
•¡ADVERTENCIA! NO DEJE QUE EL CORDÓN CUELGUE DEL BORDE DE LA MESA O RE-
POSTERO, YA QUE PUEDEN OCURRIR QUEMADURAS U OTROS DAÑOS PERSONALES
SI ALGÚN NIÑO TIRA DEL CORDÓN Y HACE CAER EL ELECTRODOMÉSTICO.
•Asegúrese de que el controlador de temperatura se encuentre en “OFF” (apagado). Acople el
controlador de temperatura al aparato, asegurándose de que encaje hasta el fondo y quede jo
en su lugar.¡ADVERTENCIA! Nunca enchufe el controlador de temperatura al electrodoméstico
si éste está conectado a la electricidad; siempre conéctelo al aparato antes de conectar al
tomacorriente.
•Este electrodoméstico debe de ser usado solamente con el controlador que viene con el
aparato.
•Conecte el enchufe a la electricidad y proceda a encender el aparato.
Este electrodoméstico debe de estar conectado a tierra.
•Para encender la plancha freidora, simplemente regule el controlador de temperatura al nivel
deseado de temperatura.
•La luz indicadora y el calentamiento se activarán y desactivarán alternadamente de forma
automática una vez que se haya llegado a la temperatura adecuada. El electrodoméstico está
listo para usarse.
•¡ADVERTENCIA! No utilice utensilios de metal o artículos similares ya que éstos pueden
arañar la capa antiadherente y dañar el electrodoméstico.
Utilice utensilios de madera o de plástico.
•¡PRIMER USO! La primera vez cubra la supercie de cocción con una pequeña cantidad de
aceite de cocina.
BEFORE FIRST USE
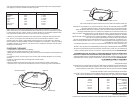
1. Insert the probe rmly into the socket. Important: Make sure the control is securely inserted.
2. Plug unit into an AC electric outlet.
3. Turn temperature control to desired setting or according to your recipe. The indicator light
comes on. The desired temperature should line up with the indicator light. When the selected
temperature is reached, the light goes off.During cooking the light will blink on and off, indicating
the temperature is maintained.
4. When nished cooking, set temperature control to WARM to keep food
at serving temperature.
5. To take the skillet to the table for serving, remove the variable temperature
control by pressing the quick-release lever and pulling out the control.
Caution: Be careful when removing the probe as the skillet might stay warm for a while.
6.Use plastic, rubber or wood utensils when cooking and serving. If using metal utensils, be
careful not to scrape the nonstick nish.
HOW TO USE
1. Place skillet on a dry, level surface. To prevent possible heat damage to your countertop,
place a heat resistant counter protector, such as aluminum foil, under appliance.
2. Insert the heat control into the skillet so the two electrical pins on the skillet are fully inserted
into the heat
3. Connect cord to a polarized outlet only. As a safety feature, this appliance has a polarized
plug (one blade is wider than the other).This plug will only t in a polarized outlet one way. If
the plug does not t fully in the outlet, reverse the plug. If it still does not t, contact a qualied
electrician. Do not attempt to defeat this safety feature.
4. Turn heat control to desired temperature. Remove cover and preheat skillet. Pilot light goes
off when selected temperature is reached (this takes approximately 10 to 15 minutes).
5. Prepare food for cooking.
6. Because the skillet features a nonstick nish, food may be prepared with or without shorten-
ing, according to taste.
7. Place food in skillet and cook according to temperature-timetable. Heat should be adjusted
according to personal preference and particular food being cooked. During cooking, pilot light
will go on and off indicating desired temperature is being maintained.
8. Turn heat control to OFF when cooking is completed. Unplug heat control from wall outlet
then from appliance.