


Care and Cleaning
1. Plastic or nylon pads / scourers,these may scratch the
surface.
2. Household abrasive powders.
3. Oven chemical cleaners,aerosols and oven pads.
4. Caustic cleaners,these will etch the surface
and attack the metal frame.
5. Bath and sink cleaners may mark the surface.
Oven Liners – sides.
It should not normally be necessary to clean the
‘Credaclean’ panels in water. If desirable remove the rod
shelves and the side panels and wash them in warm
soapy water,followed by rinsing in clean water.
The surface of the ‘Credaclean’ oven liners are treated
on
the mottled face with a special vitreous enamel which
absorbs cooking soils. At temperatures of 220˚C (425˚F)
or above, the special surface enables these soils to be
slowly destroyed.The higher the temperature the more
effective it is.If higher cooking temperatures are not used
regularly it may be necessary,to prevent heavy soiling,to
turn the oven control at maximum setting for a couple of
hours.
Cleaning
Materials
to avoid
How
Credaclean
Works
TURN OFF THE MAIN SWITCH BEFORE CLEANING.
BEFORE SWITCHING ON
AGAIN,ENSURE THAT ALL CONTROLS ARE IN THE OFF POSITION.
NEVER USE BIOLOGICAL WASHING POWDER,HARSH ABRASIVES,
SCOURING PADS, AEROSOL CLEANERS OR OVEN CHEMICAL CLEANERS
OF ANY KIND, unless specified below.
Remove the grill pan and the wire grid food support,it is best
to wash these items immediately after use to prevent stains
from being burnt on when used again. Wipe out the grill
compartment, use a fine steel wool soap pad to remove
stubborn stains from the rod shelf and the floor of the
compartment.
Wipe with a damp cloth and polish with a dry cloth.
Wipe over the grill door glass panel with a cloth wrung out in
hot soapy water,then after wiping with a cloth wrung out in
clear water,dry with a soft clean cloth.Ensure that glass door
panels are not subjected to any sharp mechanical blows.
Glass Inner Door Panel (where fitted) – open the door fully
and unscrew the two screws securing the glass panel,taking
care not to allow the glass to fall.The glass panel may now be
washed at the sink.Stubborn stains can be removed by using
a fine steel wool soap pad.
Take particular care not to damage the inner surface which is
coated with a heat reflective layer.After cleaning,rinse and dry
with a softcloth.For slight soiling the inner glass panel may be
cleaned,while still warm,without removing it from the door.
Warning: Oven must not be operated with inner door glass
removed.
Remove the rod shelves.
Use a fine steel wool soap pad to remove stubborn stains from
the rod shelves and the floor of the oven. Take care during
cleaning not to damage or distort the door seals,if necessary
remove the seal by carefully unhooking the corner clips.
Grill
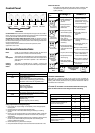
Control panel
Doors
Main Oven
Oven
With the oven door closed, heating of the
oven is achieved by turning the control
clockwise to the required ‘oven temperature’
scale on the control panel, as recommended
in the temperature charts.The pilot light will
immediately come on and go off during
cooking as the thermostat maintains the
correct temperature.
At the end of the cooking period there may
be a momentary puff of steam when the oven
door is opened. This will disperse in a few
seconds and is perfectly normal
characteristics of an oven with a good door
seal.
Remember to switch off the oven control
after cooking is finished.
Oven Cookery Notes
Wipe the joint,dry well with a clean cloth,kitchen tissue,etc.,and weigh
it. Meat which has been stored in a refrigerator, should be allowed to
come to room temperature for approximately 30 minutes before
cooking. Always completely thaw frozen meat before cooking. Beef,
lamb and mutton may be lightly floured,but pork should have the rind
scored, brushed over lightly with olive oil,and sprinkled with salt – for
crisp crackling.
Place joint in meat pan (small joints weighing less than 1.5kg (3lbs)
should be roasted in a smaller pan/meat tin, or they may be ‘pot
roasted’ – a small joint in a large meat pan causes unnecessary oven
splashing).Additional fat should not be used, except for veal,very lean
meat, poultry, which can either be ‘larded’ with bacon fat or brushed
over very
sparingly with melted fat/cooking oil. When potatoes are
roasted round the joint, they only require to be coated in melted
fat/cooking oil.It is not necessary to baste,when roasting in an electric
oven,and liquid/stock should not be added to the meat pan.
Oven Control
Note:
Note:
To prepare meat for roasting in your electric oven.
The secret of succulent,tender meat, is not to roast quickly at too high a
temperature.Best results are obtained when roasting is carried out at low
temperatures.When a lower temperature is used,joint loses less weight,is
more tender (too high a temperature causes meat to be tough and dry),
and the splashing of fat onto oven interior is reduced.When a complete
meal is being cooked in the oven,cooking time may need to be increased,
and temperature may need to be raised for approximately the last 30
minutes of the cooking period (for instance when cooking Yorkshire
pudding to serve with roast beef).Never use meat pans larger than 390 x
300mm (15”x12”) and baking trays no larger than 330x255mm (13”x10”),
these should be positioned centrally on the oven shelf.Food should not be
placed directly on the floor of the oven.To avoid unnecessary cleaning,rod
shelves which are not in use,should be removed from the oven.
The times and temperature suggested should be used as a guide but may
vary according to:–
1. Whether you prefer meat rare,medium or well done.
2. The size and shape of your joint.
a) A short thick joint requires a longer cooking period than a long
thin joint.
b) A small joint under 1.5kg (3lbs) takes longer per 450g (1lb) than a
large one,whereas a large joint over 3kg (6lbs) will cook in the
time given
for ‘minutes’per 450g (1lb) without the ‘minutes
’
over
added.
c) Boned/rolled and stuffed joints take longer to cook through than
those with a bone.(The weight of stuffing should be added to the
oven ready weight meat/poultry to calculate roasting times.)
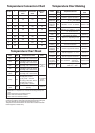
Temperature and Time
The oven temperature charts’ are a guide only, giving approximate
cooking temperatures and times. To suit personal taste and
requirements, it may be necessary to increase or decrease
temperatures by 10˚C.