


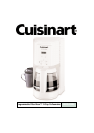

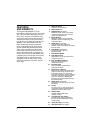
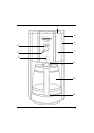
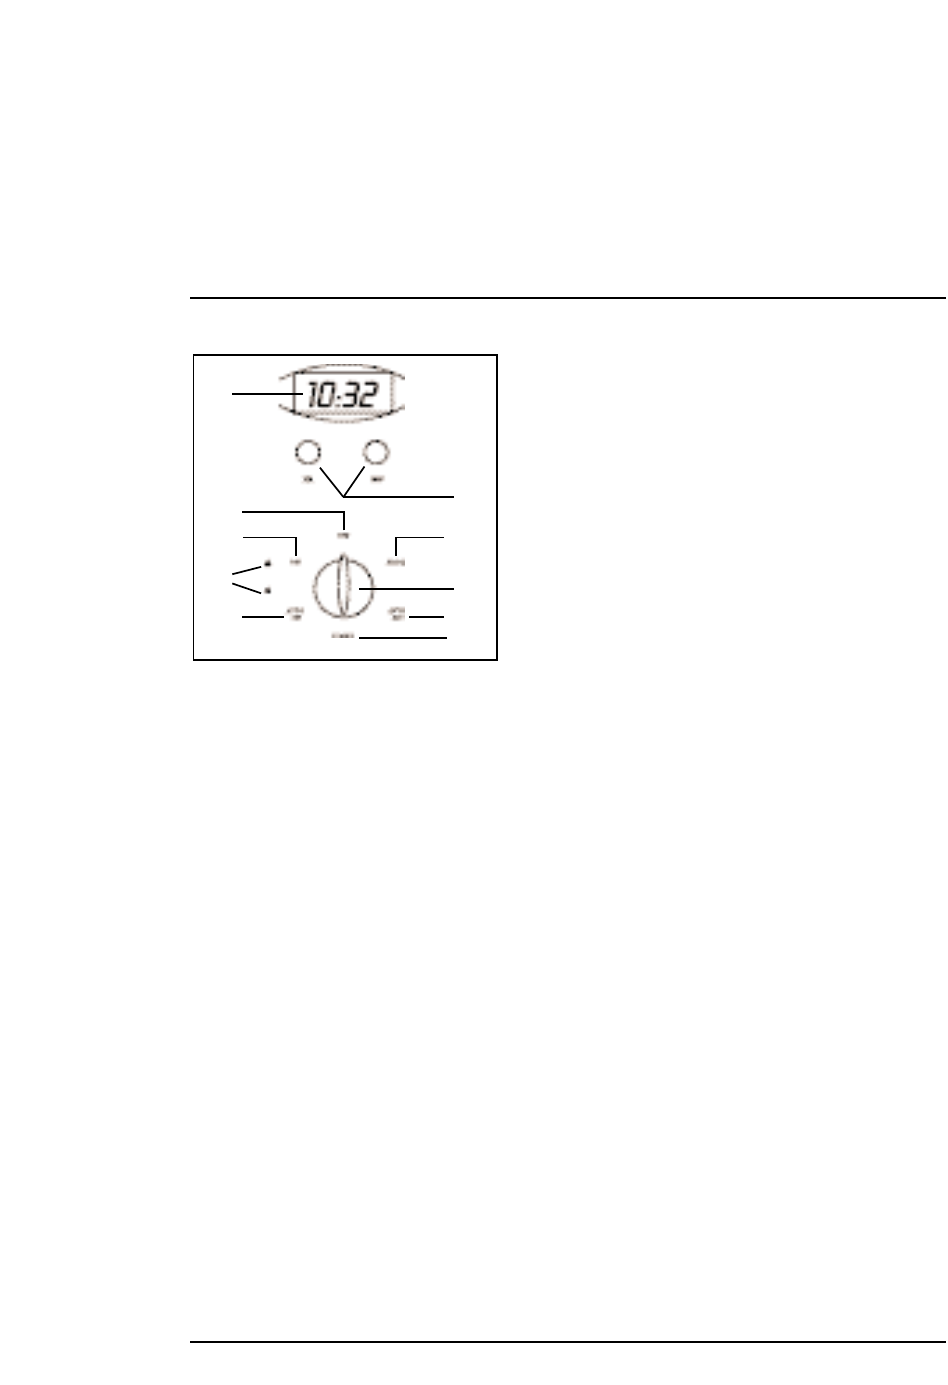
CONTROL PANEL
1. Clock Display
Displays time of day and auto
on/off times.
2. Function Knob
For use in turning coffeemaker on and off,
setting time of day, and setting auto on and
auto off times.
a. On: The On function starts the brew
cycle.
b. Off: The Off function ends the brew
cycle.
c. Auto On: The Auto On feature is used to
program the start time of the brew cycle.
The auto on time can be set for any time of
day or night. The “PM” indicator is displayed
on the LCD for nighttime program times.
d. Auto Off: The Auto Off function is used
to shut off the coffeemaker at a pre-set time,
anywhere from 0 to 4 hours. .
e. Program Set: The Program Set
function is used to set the time for the
Auto On function.
f. Clock Set: The Clock Set function is
used to set the time of day.
g. Audible Tone (not shown): The
Programmable Filter Brew
™
12-Cup
Coffeemaker is equipped with an audible
tone which will sound 5 times when the
coffee has completed brewing (coffee will
continue to stream from the filter for several
seconds thereafter).
3. Hour and Minute Buttons
For use in setting hour and minutes for time
of day, auto on time and auto off time.
4. On and Auto On Indicator Lights
PROGRAMMING YOUR
COFFEEMAKER
1. To turn the coffeemaker on and off:
a. Turn on: To turn coffeemaker on, turn
the function knob to the “On” position.
The red “On” indicator light illuminates and
brewing cycle starts.
b. Turn off: Turn the function knob to
the off position.
2. To set the time:
Turn the function knob to “Clock”. The
numerals start to blink. Push and hold or
pulse the “Hour” or “Minute” buttons to set
the time of day.
Turn the function knob to any other
setting to begin time, or simply wait until
the numerals stop blinking.
a. “Hour” Button: To change the hour,
press the “Hour” pushbutton. Pressing and
holding the pushbutton will cause hours to
increase more rapidly. Pulse the pushbutton
to increase hour more slowly. When the
number count passes 12, the PM light acti-
vates and will be displayed on the LCD. b.
“Minute” Button: To change the minute,
press the “Minute” pushbutton. Pressing
and holding the pushbutton will cause min-
utes to increase more rapidly. Pulse the
pushbutton to increase minutes more slowly.
Note: As you scroll, the numbers will advance
slowly at first and then speed up to the rate
of about three per second. When the number
displayed approaches the desired setting,
release the button and press repeatedly to
advance one digit at a time.
3. To program the Auto On:
Turn the function knob to “Program” to
set the desired time to engage the Auto
On. Change the auto on time with the
program setting using the minute and hour
pushbuttons, as you would to set the time of
day. Then turn the function knob to “Auto
On”. The LCD will display the current time.
The green light comes on to signal that
6
1
2b
2a
4
2c
3
2e
2
2d
2f