


5
BEFORE FIRST USE
• Remove all packaging materials and any
promotional labels or stickers from your
Sparkling Beverage Maker. Be sure all
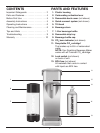
parts (listed in Parts and Features) of your
new drink maker have been included
before discarding any packaging materials.
• You may want to keep the box and
packing materials for use at a later date.
• Before using your Cuisinart Sparkling
Beverage Maker for the first time, remove
any dust from shipping by wiping the
housing with a damp cloth.
• Thoroughly clean carbonating stem and
beverage bottle.
• All removable parts can be submerged in
water for cleaning.
• Never place the unit housing in the
dishwasher or immerse it in water.
Always use a damp cloth to wipe clean.
ASSEMBLY
INSTRUCTIONS
Assembling the Sparkling Beverage Maker
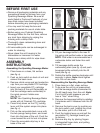
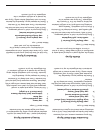
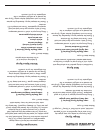
1. Place base on a clean, flat surface
(see fig. a).
2. Push up lock switch on back of unit and
remove the back cover.
3. Remove shrink-wrap seal and protective
cap from your recyclable CO2 cartridge.
4. Insert your recyclable CO
2
cartridge
into the back of the unit horizontally so
that the cartridge rests comfortably in
the quick-connect holder area
(see fig. b).
NOTE: Your Sparkling Beverage Maker
works with all Cuisinart CO
2
cartridge.
5. Press firmly down on the CO
2
locking
lever until the system snaps into place
(see fig. c).
6. Pick up the removable back cover with
the two prongs facing down, and insert
them into the base of the unit. Push the
cover toward the unit to lock into place.
7. Place the removable drip tray in the
base of the unit.
8.
Fill your beverage bottle to the max fill
line using cold purified water or tap water.
NOTE: Cold water is recommended as it
carbonates better and faster than cold
water.
9. Tilt beverage bottle under the
carbonating stem (see fig. d) and push
beverage bottle vertically into the tilt
head (see fig. e).
10. Rotate the bottle counter-clockwise until
securely in place. Note: Hand tighten
only. Do not use tools.
Disassembling the Sparkling Beverage Maker
1. Place base on a flat, clean surface.
2. To be sure the unit is not pressurized,
pull the beverage bottle (connected to
the tilt head) away from the unit. Note:
If unit is still under pressure you will
hear a “hiss” when tilting.
3. Remove the beverage bottle by rotating
it clockwise until it releases from the tilt
head.
4. Remove the back cover by pushing up
the lock switch, and, holding the cover
by the sides, pull it off of the unit.
5. Push the locking lever up and pull the
recyclable CO
2
cartridge toward you
to remove.
6. Remove drip tray by placing fingers
in integrated finger slots, and pulling
it away from unit.
fig. a fig. b fig. c
fig. efig. d fig. f