


87
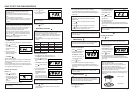
§ CHILD LOCK
To prevent child from operating the oven, install the childlock key.
1. Press button for 3
seconds.
“Loc” will show in the display
and all buttons do not
operate.
2. Press stop button for 3
seconds once again, then
childlock is canceled.
§ CLOCK
This is a 24(12) hours clock.
When the oven is plugged in, “0” appears in the display window.
The time of day will be displayed at all times, except when the
oven is operating.
In case of a power failure or if the oven is unplugged, the clock
has to be reset for the proper time. Once power is restored or the
oven is plugged in, the display will show “0”.
SETTING THE CONTROLS
Example: 4:35
1. Press button for 3
seconds. Select 24Hr or
12Hr.(24Hr or 12Hr can be
selected alternatively as the
button is pressed in
sequence.)
2. Turn the DIAL KNOB for hour you want.
3. Press Button.
4. Turn the DIAL KNOB for
minute you want.
5. Press buttons.
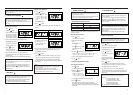
§ MICROWAVE COOKING
SETTING THE CONTROLS
1. Press button. The display will show “P-HI”.
This oven has 10 power levels from P-HI to P-10.
2. Press the button to select
the desired microwave power
level.
For example: power level 80
Press button two times
more.
3. Turn the DIAL KNOB for the
desired cooking time.
For example: 18minutes
Turn right or left the DIAL
KNOB.
Then, 18:00 will show in the
dispaly. Time can be set up
from 10 seconds to 60 minutes
4. Press button.
The oven will now start microwave cook for 18 minutes at
power level P-80.
START/CLOCK
M/W
M/W
M/W
M/W
START/CLOCK
START/CLOCK
START/CLOCK
START/CLOCK
START/CLOCK
STOP/CLEAR
HOW TO SET THE OVEN CONTROLS
Tips:
• Be sure to read the cookbook's introduction before
operating the oven.
• Also remember to read this operating instruction for
proper safety information and instruction before using the
oven.
• See the cookbook for specific recipes.
• Prior to setting the controls, place one cup of water in the
oven, on a heat-proof glass measuring cup, for testing
purposes.
Note:
• The time setting has an interval of 10 seconds from 10
seconds to 5 minutes, 30 seconds from 5 minutes to 15
minutes, 1 minute from 15 minutes to 30 minutes.
2 minutes from 30 minutes to 60 minutes.
• At the end of each cooking, the cooling fan will run for
time 5 minutes to cool the oven.(The display will show
“cool” then the button is pressed after cooking.)
However, you can proceed with further cooking
immediately even in this stage.
STOP/CLEAR
Note:
• Hour is blinking.
Note:
• To insure the best microwave and defrost results, be sure
to start with a cool oven. This is important if grill,
convection, or combination was used prior to microwave
cooking. The cooling fan will run for 5 minutes after the
end of cooking.
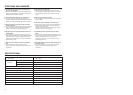
ƒUThe variable power Level settings equal the following
wattage.
Note:
- Minute is blinking.
DISPLAY POWER LEVEL DISPLAY POWER LEVEL
P-HI 100% P-90 90%
P-80 80% P-70 70%
P-60 60% P-50 50%
P-40 40% P-30 30%
P-20 20% P-10 10%
M/W
M/W
5. Four beeps will sound at the end of the cooking time.
The indicator light will go off. The display panel will return to
the time of day. The oven light will turn off and the turntable will
stop turning.
§ TIME DEFROST
SETTING THE CONTROLS
1. Press button twice.
2. Turn the DIAL KNOB for the
desired defrosting time.
For example: 18 minutes
Time can be set up from 10
seconds to 60 minutes.
3. Press button.
4. Four beeps will sound at the end of the cooking time.
The indicator light will go off. The display panel will return to
the time of day. The oven light will turn off and the turntable will
stop turning.
§ WEIGHT DEFROST
SETTING THE CONTROLS
1. Press button.
2. Turn the DIAL KNOB for the
desired defrosting weight.
For example: 2.3kg
3. Press button.
4. The display will show the
defrosting time.
5. Four beeps will sound at the
end of the cooking time.
The indicator lights will go off. The display panel will return to
the time of day. The oven light will turn off and the turntable will
stop turning.
§ GRILL COOKING
SETTING THE CONTROLS
1. Press button.
2. Turn the dial knob for the
desired cooking time.
For example: 25 minutes
Time can be set up from 10
seconds to 60 minutes.
3. Press button.
4. Four beeps will sound at the end of the cooking time.
The indicator light will go off. The display panel will return to
the time of day. The oven light will turn off and the turntable will
stop turning
START/CLOCK
GRILL
GRILL
START/CLOCK
DEFROST
DEFROST
START/CLOCK
DEFROST
DEFROST
Note:
CHANGING THE CONTROLS DURING THE OVEN
OPERATIOHN
1. Press button. The display will show the current
power leve.
2. Press button again to change the power level.
(If button is not pressed within 3 seconds, the
display will show the operation mode.)
M/W
M/W
M/W
WEIGHT TIME
DEFROST
GRILL
Note:
• After the end of microwave cooking, the cooling fan will
run for 5 minutes.
Note:
• During the defrosting operation, turn the food over after
you hear 4 times of 4 beeps for complete defrost.
Note:
• When the selected operation is over, a cooling fan will
run for 5 minutes.
Note:
• If step 2 is omitted, the oven will cook at full power.
Note:
• This mode allows you to set weight from 0.1kg to 2.9kg
• During the defrosting operation turn over the food after 4
beeps sound 4 times for complete defrosting.
Note:
• When the selected operation is over, a cooling fan will
run for 5 minutes.
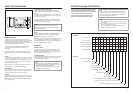
Note:
• The heating element is located in the top of the oven.
To use:
• Place food on Metal Rack.
• Place the Metal Rack directly on the Turntable.
• While Grilling, be careful as the trays will be hot to the
touch. Use oven mitts while handling trays.
• Never touch the oven window and metal interior of the
oven when taking food in and out. The temperature
inside the oven and door is quite high.
• Do not open the door so often, the temperature inside the
oven decrease and the cooking may not complete in the
setting time.
WEIGHT TIME
DEFROST
kg
GRILL
METAL RACK
TURNTABLE