


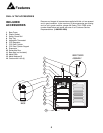
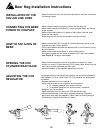

INSTALLATION OF THE
CO2 AIR LINE HOSE
• Attach the end of the air line (red) hose provided to the hose connection
on the keg coupler.
Beer Keg Installation Instructions
CONNECTING THE BEER
TOWER TO COUPLER
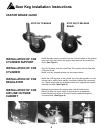
• Make sure the washer is properly inserted into the wing nut.
• Make sure the small round bead is in place (dropped down into the top
of the coupler).
• Make sure the ball retainer is in place on the coupler, with the ‘arms’
down into the coupler.
• Place wing nut into the top of the coupler turning until tight.
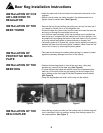
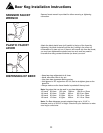
HOW TO TAP A KEG OF
BEER
• Make sure that the CO2 is turned off, and the Secondary valve on the
regulator is in the ‘Closed’ position.
• Pull out and release the pressure release valve on the Coupler to purge
any air pressure.
• Make sure the beer tower faucet is in the closed position.
• Pull tapping handle out and press downward until it locks into position.
(See Figure 8) The keg is now tapped.
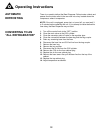
OPENING THE CO2
CYLINDER MAIN VALVE
• Make sure the secondary shut-off valve (shown in figure 9 in ‘Open’
position) is closed. To open the main CO2 cylinder valve, slowly turn the
main valve counter-clockwise until fully open.
• Notice the needle on the regulator gauge start to climb.
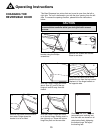
ADJUSTING THE CO2
REGULATOR
The gauge monitors low internal keg pressure and should be adjusted to
read between 10-12 psi. (See Figure 10). The pressure can be adjusted
as needed.
• Release adjustment lock nut marked 2.
• Using a flat screwdriver, turn regulator screw marked 3.
o To increase pressure, turn screw clockwise.
o To decrease pressure, turn screw counter - clockwise.
• Retighten lock nut marked 2.
• Open secondary shut off valve to let CO2 flow into the keg.
• Allow several minutes for the keg to properly pressurize. Regulator
gauge may drop while this happens. (Note: Listen for hissing along all
connections to identify if there are any leaks)
Figure 7
Figure 8
Figure 9 Figure 10
10