


OPERATING INSTRUCTIONS
7
• After clock has been set, the word prompt clock will always show on the display unless oven is in a cooking
operation.
Changing the Clock Time:
• Touch the CLOCK pad once. The display will show “ENTER CLOCK TIME”.
• Enter the correct time of day by touching the number pads. See Section A on previous page to complete
setting the clock time.
SETTING THE CLOCK: If you MAKE A MISTAKE IN SETTING THE CORRECT TIME, start over by
pressing the CLOCK pad twice.
To RECALL TIME OF DAY WHILE YOU ARE COOKING: press the CLOCK pad. Time of the day will
be displayed for 3 seconds before returning to displaying the remaining cooking time.
In case of POWER FAILURE: when the power has been restored, the oven will be in a clock set mode.
Follow the directions on page 11 for setting the clock.
BEEPS DURING OVEN SETTING:
ONE beep: Oven accepts the entry. Information has been entered in the correct sequence.
TWO beeps: Oven does not accept the entry. Check and try again.
SETTING THE OVEN TIMER: Timer works independent from cooking and can be set anytime for various
kitchen tasks. Use oven timer though oven is also timing a microwave cooking function. Cooking time
countdown will be temporarily replaced on the display while timer is being set. Enter the amount of time you
wish to set by touching the correct number pads. Digit time is in minutes and seconds and set left to right. Set
one digit (a 5 for 5 seconds) or up to four digits (2405 for 24 minutes, 5 seconds). ENTER TIMER remains on
the display- Touch START/STOP pad. The word TIMER will flash and timer countdown will be seen on
display for 3seconds before cooking time is returned to display.
To STOP or RESET TIMER when cooking is not taking place, touch RESET pad. When SETTING TIMER
DURING A COOKING OPERATION, take care to set timer correctly. Once the timer is set during cooking,
setting cannot be changed without resetting the cooking function at the same time. Touching RESET will not
allow you to change timer setting while cooking. When end of time has been reached, one long beep can be
heard and timer will leave the display. If oven is not cooking, CLOCK and time of day (if set) will return to
the display. If oven is in cooking operation, one long beep can be heard and TIMER will
leave display while oven is continuing cooking time countdown.
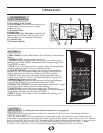
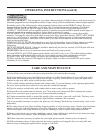
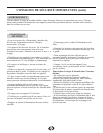
Power
Level
% of
Power
10
9
8
7
6
5
4
3
2
1
100
90
80
70
60
50
40
30
20
10
SETTING THE COOKING TIME & POWER LEVEL: When cooking at 100%
power, simply set cook time by touching number pads (for example, 3 minutes: touch 3-0-
0) and START. 100% power is automatically set. For 1-step cooking, you do not have to
touch COOK pad before setting time.
TO COOK AT LOWER POWER LEVELS: After setting cook time, touch POWER
pad then single digit representing the power level desired. Touch START pad. Since oven
automatically assumes 100% power, you must switch power level (when desired) after
setting cook time.
CONTROLS
(continued)
TWO-STAGE COOKING: Two-stage cook function allows you to cook a food at two different power levels
with one time setting. For example, rice should be cooked in two stages. Stage 1 starts rice at 100% power for
5 minutes; Stage 2 completes cooking 10-12 minutes at 50% power level.
SET STAGE 1: Assuming 100% power, just touch number pads corresponding to the desired length of first
stage cooking time (most 2 stage recipes start with 100% power but you can also switch power levels after
setting cook time.) DO NOT TOUCH START PAD.
SET STAGE 2: Touch COOK pad then enter proper cooking time and (lower) power level (most 2 stage
recipes use lower power for second stage). Touch START pad. First stage of cooking begins. MEM (memory)
word prompt shows on the display during Stage 1 Cooking, indicating that the oven is remembering that a
second step (stage 2) has been programmed. After Stage 1 time has elapsed, signal may be heard, indicating
the beginning of Stage 2.
AFTER TOTAL TIME HAS ELAPSED, 4 longbeeps sound and END appears in display. Touch RESET pad
or open oven door to clear END before starting another cooking function.