


8
Installation Instructions - Integrated Application
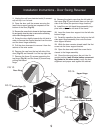
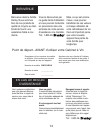
Preparing the
Enclosure
FOR YOUR SAFETY:
While performing
installations described in
this section, gloves, safety
glasses or goggles should
be worn.
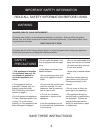
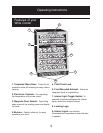
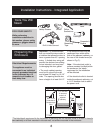
34-½" From
Underside of
Countertop to
Floor
2"
6"
Electrical Access
1-½" dia. hole
*If electrical
outlet is in
adjacent
cabinetry
*
24"
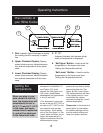
Tools You Will
Need
Carpenter’s
Square
Measuring
Tape
Level
Drill & Hole Saw set
Gloves
Safety Glasses
Flashlight
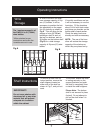
Electrical Requirements:
The appliance must be
connected to an individual
properly grounded electrical
outlet, protected by a 15
ampere circuit breaker or
time delay fuse.
Important: It is recommended
that you install the wine cooler in
a location that allows the door to
have a greater then 45° opening
swing.
A limited door swing will
prevent the shelves from sliding
out as intended, and may lead
to damaging the door gasket.
• The rough cabinet opening
must be on a level floor area
and at least 24” deep* by 12-1/2”
wide. The opening should also
have a height of at least 34-1/2”.
• The electrical outlet may be
positioned from within either
side of the adjacent cabinetry, or
the rear of the shaded area (as
shown in Fig C.).
Note: If the electrical outlet is
surface mounted (not flush) within
the enclosure, the
depth
requirment for the installation
will be affected.
• If the electrical outlet is located
inside the adjacent cabinetry
, cut
a 1-1/2” diameter hole to admit
the power cord.
Fig C
*The listed depth requirment for the installation is assuming that the electrical outlet is located in the adja
-
cent cabinetry or is flush mounted in the rear wall, not surface mounted in the enclosure.
Philips
Screwdriver