


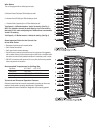


DEFAULT SETTINGS: When the unit is first connected to a 120V/60Hz power
supply, (and/or in the event of a power failure) temperature settings
automatically revert to the following default settings;
The LED default setting for the internal (cabinet) temperature is the "real time"
(ambient) temperature measured at the time the unit is connected or power is
restored.
The LED default setting for the set operating temperature is 50ºF / 10ºC. (after
a power failure has occurred, the previously set temperature is automatically
erased and will have to be re-set)
The LED default setting for temperature selection (ºF/ºC) is ºF. (Farenheight
Scale)
SETTING OPERATING TEMPERATURE: To set/change the operating
temperature;
1. Press and release either of the +/- (temperature) keys.
The LED display will temporarily reveal the (flashing) set temperature for
approximately 5 seconds. (If you fail to set/change the operating temperature
within this 5 second period, the LED will automatically revert back and display
the internal (cabinet) temperature.
2. Each depression of the +/- key (during flashing mode) will increase the
temperature
incrementally by 1º (Temperature ranges between 43ºF ~ 57ºF / 6ºC ~ 14ºC)
3. Each depression of the +/- key (during flashing mode) will decrease the
temperature
incrementally by 1º (Temperature ranges between 43ºF ~ 57ºF / 6ºC ~ 14ºC)
The operating temperature will "flash" in the LED display for approximately 5
seconds after the selection is made, then revert back to display the internal
(cabinet) temperature.
TEMPERATURE SELECTION (ºF/ºC): This unit can display temperatures on
the "Farenheight" or "Celsius" scale. Press the temperature selector keypad to
alternate between ºF/ºC scale. The "blue" indicator light adjacent to the
corresponding mode will illuminate to signify the selection made.
Cleaning
To clean the inside, use a soft cloth and a solution of a tablespoon of baking
soda to one quart of water, or a mild soap suds solution, or some mild
detergent. Clean the wooden wine racks (shelves) using a lightly dampened
cloth then dry throughly with a soft cloth. Clean the outside with a soft damp
cloth and some mild detergent or appliance cleaner.
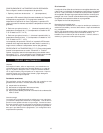
Vacation Time
For short vacation periods, leave the electronic controls at their usual settings.
During longer absences,
(a) remove bottles,
(b) disconnect from electrical outlet,
(c) clean the wine cooler thoroughly,
(d) leave door open to avoid possible formations of condensate, mold or odors.
Power Failure
Most power failures are corrected within an hour or two and will not affect the
internal temperature of your wine cooler. Try and minimize the number of door
openings while the power is off. During power failures of longer duration, take
steps to protect your wine.When power is restored, the previously “set”
operating temperature is automatically erased and must be re-programmed.
(See Setting Operating Temperature)
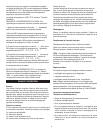
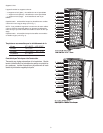
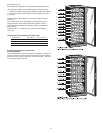
If You Move
Remove or securely fasten down all loose items inside the wine cooler. To
avoid damaging the leveling screws, turn them all the way into the base.
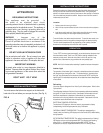
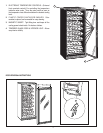
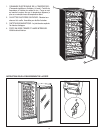
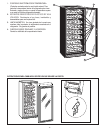
Light Bulb Replacement
To replace the interior light bulb;
Remove the screw holding the light bulb cover, remove cover. Unscrew light
bulb. Replace light bulb.
NOTE: This aplliance uses a standard 40 watt appliance bulb only.
(available at most local hardware stores) Replacement bulb should not
exceed 40watt rating.
Replace light bulb cover. Re-install screw to secure cover.
Cabinet bonderized and acrylic-enameled according to the most modern
electrostatic spraying techniques. High-density polyurethane thermal
insulation. Magnetic door closure gasket.
3
CARE & MAINTENANCE