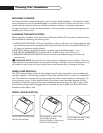
Finishing The Installation
9
TO FINISH THE INSTALLATION
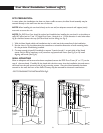
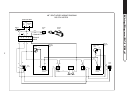
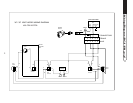
Once the ventilation hood has been mounted in
place it will be necessary to install the electrical
service. All electrical work should be done by a
qualified electrician and must conform to all local
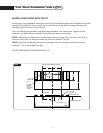
standards. Refer to the wiring diagrams on Pgs.
14-15, for proper hook-up and grounding.
NOTE: Black=live,White=neutral, Green=ground
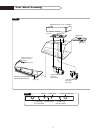
Complete installation by making ductwork con-
nections, testing unit functions, and installing & fin-
ishing drywall.
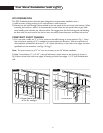
CARE AND USE
CONTROLS- We recommend you turn your
hood on before you begin cooking to establish fresh air flow.After you've finished cooking, let the
blower run for a few minutes to clear the air and help keep the kitchen fresh and clean.
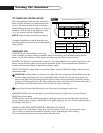
BLOWER- The blower is operated with 2 controls. The switch adjacent to the speed control turns the
blower on/off, while the speed control adjusts the blower speed. Turn the speed knob clockwise to
increase and counterclockwise to decrease the blower speed.
HOOD LIGHTING- A single switch controls both lights. Use only 50W Max. Halogen Narrow Flood
replacement bulbs.
CAUTION- Halogen lamps are constructed of a glass bulb with a pressurized internal filament tube that
operates at high temperatures and could unexpectedly shatter. Should the outer bulb break, particles of
extremely hot glass could be discharged into the fixture enclosure and/or surrounding environment, thereby
creating a risk of personal injury or fire.When replacing the bulb, let the bulb cool, and assure that power to
light has been turned off. Never allow hot bulb to come into contact with water.
Do Not Touch the Hood Light Bulbs when in use.They may be hot enough to cause injury.
WARMING LAMPS- Each warming lamp is controlled by its own on/off switch. Use only R40 size,
250W Max. Infrared bulbs.
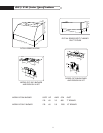
FILTERS- Filters should be cleaned frequently in a detergent solution and are dishwasher safe. Empty
grease collection tray/s regularly. Remove filter/s by gently pulling up and out. Grease collection tray/s
are beneath each filter/s.
UNPLUG the BLOWER MOTOR BEFORE CLEANING VENTILATOR.
-Remove filters to access blower motor plug. Vacuum blower to clean. Do not immerse in water.
-Do not allow an excessive accumulation of grease. -Use a mild detergent when cleaning.
-Do not use harsh abrasives, steel wool pads, or abrasive cloths.