


INTRODUCTION
Dear customer,
You are now the proud owner of a fine DeLonghi Coffee Maker, you can enjoy traditional coffee, or
experience the taste of delicious espresso or cappuccino at the end of a perfect meal with family or
friends. All this is possible with one compact unit.
The enclosed material has been carefully prepared, to familiarize you completely with the operation of
this machine.
Please read all instructions fully before attempting to operate this appliance.
BECOME FAMILIAR
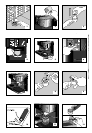
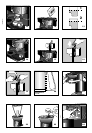
Before using your DeLonghi coffee maker for the first time, it is important that you become familiar with all
of its parts. Do this by means of a practice run. DO NOT PLUG IN.
Unscrew the reservoir cap of the espresso/cappuccino maker, turn the steam control knob on and off,
place the filter in the filter holder, and position it in the boiler outlet. For the automatic drip coffee maker,
raise the water reservoir cover, remove the filter holder and replace. Become familiar with your appliance.
USE OF THE MACHINE
THIS MACHINE IS FOR HOUSEHOLD USE ONLY
Before use
Before using the machine for the first time, wash all accessories (filter-holder, measuring spoon, filter,
carafe, adapter, milk tank) with detergent and warm water, then rinse thoroughly. The internal circuit
should then be washed as follows:
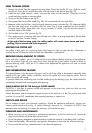
Filling the water tank
• Unscrew the water tank cap by turning counter-clockwise; lift the cap upwards and turn
counterclockwise to remove.
• Use the glass carafe (fig. 1) to fill the water tank (fig. 2). Always switch the machine off.
Do not overfill the water tank. The espresso carafe is marked with water levels for
2 cups (minimum) and 4 cups (maximum) (see table, page 12).
Important: When making cappuccino, add extra water to the steam level shown
on the carafe for two cups and to the bottom of the metal band for four cups.
Care should be taken to ensure that the correct quantity of water is placed in the
tank, as the machine always uses all the water.
• Close the water tank cap securely by turning clockwise.
6
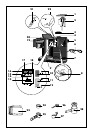
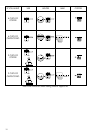
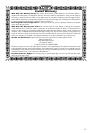
DESCRIPTION OF THE APPLIANCE
1 Removable milk reservoir cap
2 Milk reservoir with Instant Froth Dispenser
3 Removable cap with safety valve
4 Water tank
5 Steam knob
6 Power cable
7 Removable drip tray
8 Boiler outlet
9 Recessed warming plate
10 5/10 coffee switch and pilot lamp
11 Espresso/Cappuccino ON/OFF switch and
pilot lamp
12 Espresso/Cappuccino “OK” pilot lamp
13 Slider
14 “ON” pilot lamp drip coffee
15 Programming buttons
16 Display
17 “P.M. hours” led
18 “OFF” led
19 Drip coffee machine filter holder
20 Drip coffee machine water reservoir cover
21 Drip coffee machine water level
22 Flow regulator with selection from LIGHT to
STRONG coffee
23 Carafe for drip coffee
24 Filter
25 Filter holder
26 Measuring spoon
27 Adapter (if supplied)
28 Espresso carafe with lid