


CAPPUCCINO STEP-BY-STEP: HOW TO MAKE A REAL ITALIAN CAPPUCCINO
Here’s what you need
• Ground coffee
• Fresh milk (should be chilled before use)
• A teaspoon - Note: Cappuccino is served in 4 oz. or 5 oz. cups.
• Sugar or sweetener
STEP-BY-STEP INSTRUCTIONS
• Prepare the machine as described in the paragraph “How to make a perfect espresso coffee”.
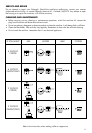
Remember, if you want 2 cappuccinos, fill the carafe up to the “ ” mark. If you
want 4 cappuccinos, fill to the bottom of the metal band.
• Place the cups under the filter-holder.
• Turn the machine ON by pressing the “Espresso/Cappuccino ON/OFF” switch.
• When the desired quantity of coffee is obtained, set the flow regulator to . In this way the coffee
will stop flowing.
• After few minutes the “OK” pilot lamp will light to indicate that the machine has reached the correct
temperature for using the “instant froth dispenser “.
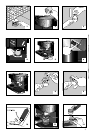
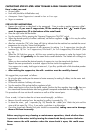
• In the meantime, pour the amount of milk necessary for making 1 or 2 cappuccinos into the milk
container (fig. 14) For 1 or 2 cappuccinos, fill to level 1, for 3 or 4 cappuccinos, fill to level 2. (See
fig. 15).
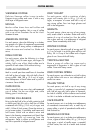
• When the OK light has gone on, shift the cups containing the espresso to under the Instant Froth
Dispenser tube, and
gradually turn the steam knob counter-clockwise. The frothed milk will begin to
flow.
When you have reached the desired quantity of cappuccino, turn the steam knob clockwise.
Repeat the same procedure for a second cappuccino then switch the appliance off.
Your cappuccino is ready. Add sugar to taste and , if you like, sprinkle with a little chocolate powder
or cinnamon.
•
After making the cappuccino, the milk container must be carefully cleaned.
We suggest that you proceed as follows:
• By using the glass carafe pour the amount of water necessary for making 2 coffees, into the water tank.
• Replace the cap.
• Fill the milk container half-way with water.
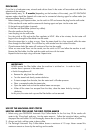
• Turn the machine ON and set the flow regulator to light.
• When water begins to flow from the boiler nozzle, position the flow regulator lever to then turn
the steam knob counter-clockwise after having placed a receptacle underneath the milk tube (fig. 16).
This procedure will rinse out the milk container as well as all the internal parts.
Once a week, it is best to clean the unit even more thoroughly , as follows:
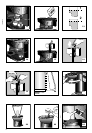
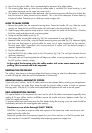
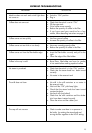
• Remove the milk container from the machine by pulling it upwards (fig. 17).
• To clean the mixer, pull it upwards (fig. 18). Remove the rubber joint. Wash the joint and the
mixer with hot water (fig. 19) or, if you prefer, wash them in a dishwasher.
• Once they have been cleaned, the parts should be reassembled,
taking care not to damage
them or fit them incorrectly.
Before carrying out any cleaning or maintenance operations, check whether there
is pressure in the water tank by turning the steam knob slowly counter-clockwise.
Never remove the milk container when the steam knob is open; this could cause
burns.
8