


has been made, the milk may continue to drip
out of the tube.
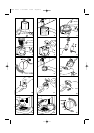
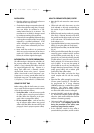
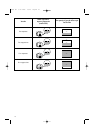
•Brew the coffee into the small espresso carafe
as paragraph “How to prepare espresso cof-
fee”. When the coffee reaches level 2 on the
side of the small espresso carafe (fig. 22), turn
the Vario System selector to “cappuccino” (fig.
15). If you allow too much coffee to come
through at this point there will not be enough
steam left to make the steam for frothing the
milk.
• Pour the coffee into 2 large cups.
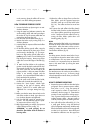
• Place the cup containing the coffee under the
tube of the milk tank, wait for the “ok” light
(fig. 24) to come on, this indicates that the
ideal temperature has been reached for froth-
ing the milk, then turn the steam release knob
in an anti-clockwise direction. The frothed milk
will come out the tube of the milk tank (fig. 19).
To keep the milk from spraying it is necessary
to attach the anti-spray nozzle (fig. 24) onto
the tube of the milk tank. This is also useful
when the cups used for the cappuccino are
quite small.
• Fill the cup with the desired quantity of frothed
milk. To ensure that the milk froths properly,
always wait for the “OK” warning light to
come on before frothing milk for each cap-
puccino.
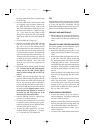
• Attention: after the last cappuccino has been
prepared, before turning the coffee maker off,
lift the suction tube of the milk tank above the
level of any remaining milk (as indicated in
Fig. 26) and allow the steam to come out for a
few seconds. With the tube out of the milk close
the steam knob. For hygiene reasons, it is rec-
ommended that this operation is carried out
to prevent any milk from going sour in the
internal circuits of the coffee maker.
•Press the ON/OFF switch for espresso/cap-
puccino to turn off the appliance.
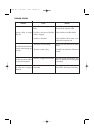
• In order to make 4 cappuccinos, it is necessary
to repeat the previous operation, paying atten-
tion to the quantity of ground coffee and water,
indicated in the chart on page 10.
•To make the perfect cappuccino, we recom-
mend the following proportions: 1/3 espres-
so, 1/3 hot milk and 1/3 frothed milk.
TIPS
When making a number of cappuccinos, to obtain
a higher temperature you should prepare one cup
at a time and then fill it immediately with the
frothed milk rather than prepare all the cups of cof-
fee at once then fill them with the frothed milk.
CLEANING AND MAINTENANCE
• Before begining any cleaning or maintenance,
turn the machine off, remove the plug from the
electrical socket and allow the machine to cool
down.
CLEANING THE MILK FROTHER (EMULSIFIER)
The cleaning operation for the milk frother must be
done after each use. Proceed as follows:
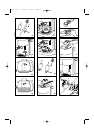
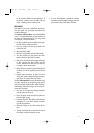
• Remove the milk tank by pressing lever C and
pulling upwards (fig 27). Wash it in hot, soapy
water.
• Remove the emulsifier by pressing down on lever
A and at the same time, pulling upwards (fig
27). Remove the rubber mixer, rinse it and clean
it thoroughly with hot water. Ensure that the
small holes in the upper part of the emulsifier are
not blocked. If this procedure is not followed the
milk will be poorly frothed or not drawn out of
the tank.
Make sure that the hole marked with the arrow
B has not been clogged (fig 28) (clean with a
needle).
• Once clean, all of the pieces must be reassem-
bled in the correct order. In particular, make
sure that the rubber mixer has been inserted
properly all the way down and that the milk
tank and the emulsifier have been inserted all
the way until a click is heard.
OTHER CLEANING PROCEDURES
•To clean the machine, do not use solvents or
abrasive detergents. A soft damp cloth should
be used to clean the surfaces.
• Regularly clean the filter holder, the removable
drip tray, the boiler outlet, and the carafe. Do
not wash the filter holder in the dish washer.
•Never immerse the machine in water: it is an
electrical appliance.
•From time to time check that the holes in the fil-
8
BCO85 GB 3-07-2002 13:45 Pagina 8