11
GAS SUPPLY
■ This appliance is suitable for use with Natural Gas or ULPG (Check the “gas type”
sticker attached to the appliance).
■ For Natural Gas the gas supply must be regulated to obtain a pressure of 1 kPa with
the two semi-rapid (SR) burners operating at the maximum.
■ For ULPG models connect the gas supply directly to the appliance test point adaptor
(supplied with the conversion kit) and ensure that the supply pressure is regulated to
2.75 kPa.
■ Do NOT force the ”elbow“ rotation prior to loosening nut.
■ Do NOT over tighten the nut at the ”elbow“.
1. After connecting the gas supply, check the piping and connections for leaks using a
soap and water solution. The presence of bubbles indicates a leak, tighten or replace
connections as appropriate.
Warning: Do not use any naked ame to check for leaks.
2. The operation of the appliance MUST be tested before leaving.
3. Adjust the test point pressure or supply pressure to the value which is appropriate for
the gas type.
4. Turn on the appliance gas controls and light each burner. Check for a well dened
blue ame without any yellow tipping. If any abnormality is evident then check that the
burner cap is located properly and the injector nipple is aligned correctly.
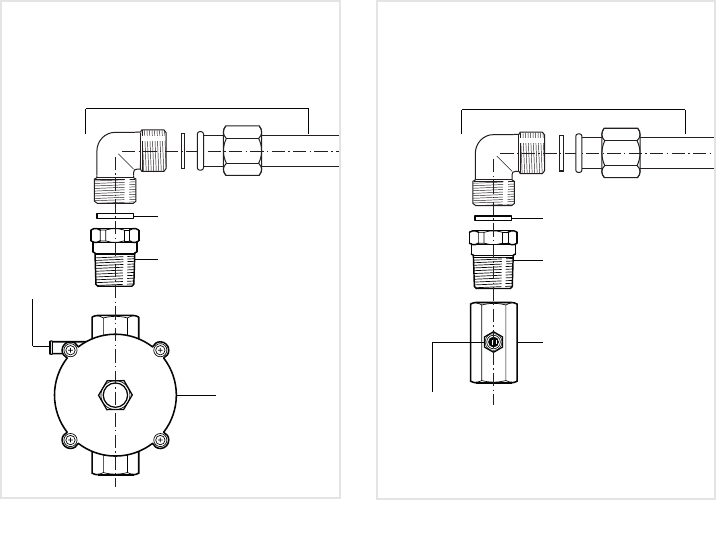
Gas connection for
NATURAL GAS
Gas inlet pipe
Gasket
Brass conical adaptor
(Thread tight: use
suitable seal)
Gas regulator
Test
point
Gas connection for
ULPG
Test point adaptor
Gasket
Gas inlet pipe
Test
point
Figure 8a Figure 8b


