


16
17
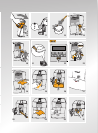
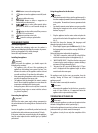
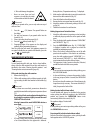
PUSH symbol fully in until it clicks into place.
Please note!
Iftheinfuserisdiculttoinsert,
you must rst adapt it to the right
dimensions by pressing it
forcefully from the bottom and
top as shown in the gure.
8. Once inserted, make sure the two red buttons have
snapped out.
9. Replace the drip tray and waste coee
container.
10. Close the service door.
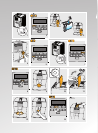
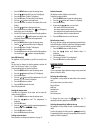
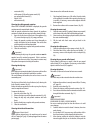
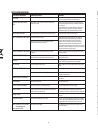
Cleaning the milk container
Clean the milk container each time you prepare milk as
described below:
1. Remove the lid of the
milk container.
2. Remove the milk
spout and intake
tube.
3. Wash all the
c o m p o n e n t s
thoroughly with
hot water and mild
washing-up liquid.
All components are
dishwasher safe,
placing them in the
top basket of the
dishwasher.
4. Make sure there are
no milk residues left
inside the holes.
5. Check that the intake
tube and spout are not clogged with milk residues.
6. Replace the milk spout and intake tube.
7. Replace the milk container lid.
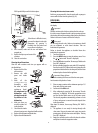
Cleaning the hot water/steam nozzle
Each time you prepare milk, clean the nozzle with a sponge to
remove milk residues from the gaskets (g. 24).
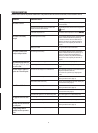
DESCALING
Descale the machine when the message “DESCALE” ashes on
the display.
Important!
Descaler contains acids which may irritate the skin and eyes.
It is vital to respect the manufacturer’s safety warnings given on
the descaler pack and the warnings relating to the procedure to
follow in the event of contact with the skin and eyes.
Please note!
Use De’Longhi descaler only. Under no circumstances should
you use sulphamic or acetic based descalers. Their use
invalidates the guarantee.
Failure to descale the appliance as described above also
invalidates the guarantee.
1. Turn the machine on.
2. Press the MENU button to enter the settings menu. Press
the or button until “Descale” is displayed;
3. Press the OK button to conrm: The message “Add descaler
PressOK”isdisplayed.
4. Before conrming empty the water tank (A10) completely.
Pour the descaler (A23) diluted with water (respecting the
proportions indicated on the descaler pack) into the water
tank and replace the tank in the appliance.
Important! Danger of burns
Hot water containing acid ows out of the hot water spout.
Avoid contact with splashes of water.
5. Place an empty container with a minimum capacity of 1.5
litres under the hot water spout.
6. Conrm with the OK button.
7. AfterconrmingbypressingOK,themessage“Descale
underway” is displayed. The descale programme starts
and the descaler liquid comes out of the water spout.
The descale programme automatically performs a series
of rinses and pauses to remove limescale deposits from
inside the machine.
Afterabout30minutes,themessage“RinsingFILLTANK”is
displayed.
8. The appliance is now ready for rinsing through with
clean water. Remove the water tank, empty, rinse under
running water, ll with clean water and replace. “Rinsing
PressOK”isdisplayed.
9. Empty the container used to collect the descaler solution
and replace it under the cappuccino maker.
10. Press the OK button to start rinsing. Hot water ows out
of the spout and the message “Rinsing Please wait” is
displayed.
11. When the water tank is completely empty, the message
“RinsingcompletePressOK”isdisplayed.
12. Press the OK button. The appliance goes o
automatically.
To turn the appliance on again, press the button.
SETTING WATER HARDNESS
The DESCALE message is displayed after a period of time
established according to water hardness.
The machine is set by default for a hardness value of 4.
The machine can also be programmed according to the actual
hardness of the mains water in the various regions, varying the
frequency with which the message is displayed.
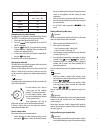
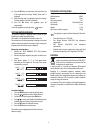
Measuring water hardness
1. Remove the “TOTAL HARDNESS TEST” (A24) indicator
paper from its pack.
2. Immerse the paper completely in a glass of water for one
second.
3. After about a minute, 1, 2, 3, or 4 red squares form,
depending on the hardness of the water. Each square
corresponds to one level.
Level 1
lmmm
Level 2
llmm
Level 3
lllm
Level 4
llll
Set water hardness
1. Press the MENU button to enter the settings menu.
2. Press the or button and select “Water hardness”.
3. Conrm the selection by pressing the OK button.
4. Press or to set the water hardness identied using the
indicator paper (see gure in the previous section).
5. Press the OK button to conrm the setting.
6. Press the ESC button to exit the menu.
The machine is now reprogrammed with the new water
hardness setting.