


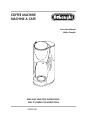
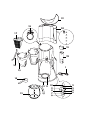

DESCRIPTION OF THE APPLIANCE
The following terminology is used repeatedly on
the following pages.
1 Power cable
2 ON/OFF and (if included) "AUTO" button
3 Display
4 Button for setting the number of cups
(if included)
5 Hour setting and increase button
6 Minute setting and decrease button
7 Timer ON/OFF button
8 "AUTO" button (if included)
9 "AUTO" pilot light
10 ON pilot light
11 Warming plate
12 Rotating base (if included)
13 Carafe for drip coffee
14 Measuring spoon
15 Filter holder for drip coffee
16 Flavor savor
17 Permanent filter (if included)
18 Drip coffee flavor knob
19 Water tank cap
20 Removable water tank
21 Chlorine filter (if included)
22 Chlorine filter holder (if included)
INSTALLATION
• Place the appliance on a working surface
away from water taps and sinks.
• Check that the outlet corresponds to the
voltage on the appliance rating plate. Connect
the appliance to a grounded outlet power
socket (minimum rating 10A) only. The
manufacturer declines all liability for any
accidents due to the incorrect earthing of the
appliance.
• Never install the machine in environments
where the temperature may reach 0°C - 31°F
or lower. The appliance may be damaged if
the water freezes.
• If the power cord is longer than the distance
required to reach the power outlet, the extra
length may be stored inside the machine by
pushing the cable inside the corresponding
opening.
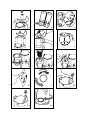
CHLORINE FILTER (included)
The filter eliminates the taste of chlorine from the
water. To install the filter, proceed as follows :
• Remove the chlorine filter from the plastic bag
and rinse it in tap water.
• Lift the coffee lid, remove the filter holder from
its housing by lifting it upwards (Fig. 1).
• Open the filter holder by pressing the parts
marked “PUSH”, and carefully position the
filter as shown in Fig. 2.
• Close the filter holder and replace it in its
housing, pushing it fully down.
• The chlorine filter must be replaced every 80
cycles, and always after six months of operation.
SETTING THE CLOCK (FIG. 3)
Plug the appliance in. When switched on for the
first time, the display will show “12:00” flashing.
To set the exact time, proceed as follows:
- Press the “HOUR” button repeatedly until set-
ting the current hour.
- Press the “MIN” button repeatedly until setting
the current minutes.
Keeping the buttons pressed scrolls the hours and
minutes much more quickly.
The time can be set whenever desired.
HOW TO PREPARE DRIP COFFEE
WARNING: the first time coffee is prepared, all
the accessories and internal circuits of the
machine must be washed as follows:
Make at least two carafes without using ground
coffee (following the instructions below).
• Lift the cap and remove the water tank (Fig. 4).
• Fill the tank with fresh, clean water up to the
level corresponding to the number of cups of
coffee required (Fig. 5).
• Place the tank back in the coffee maker,
pressing it lightly. The tank may also be filled
without being removed, using the carafe
marked with the level indicators (Fig. 6.)
• Open the filter holder by turning it to the left
(Fig. 7).
• In versions with a permanent filter, place the
filter in the filter holder (Fig. 8). In other
versions, use the #4 paper filter.
• Place the ground coffee in the filter, using the
measuring spoon supplied, and level evenly
(Fig. 9). As a general rule, use a level measuring
5