


2
MUFFLER KIT INSTALLATION INSTRUCTIONS
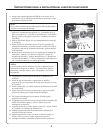
6. Apply a small amount of WD-40 to threads of muffler mounting stud
locknuts, and allow spray to penetrate.
NOTE
Turning lock nuts without first applying WD-40 may damage or break
mounting studs.
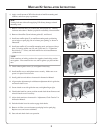
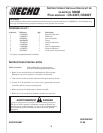
7. Remove 2 hex lock nuts (A), washers (B), and eye plate (C). Discard
lock nuts and washers. Retain eye plate for reassembly on new muffler.
8. Remove old muffler (D) and exhaust gasket (E), and discard.
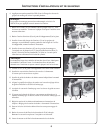
9. Install new muffler plate (F) on muffler mounting studs, positioning
curved edge to spark plug side of exhaust port opening, as shown in
illustration.
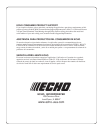
10. Install new muffler (G) on muffler mounting studs, and secure with eye
plate, (2) locking washer sets (H), and (2) hex nuts (I).* Tighten hex
nuts securely (7 - 9 Nm), and check muffler for secure attachment to
cylinder head.
*NOTE
Wide serrations on locking washers face together, interlocking washer
sets together. Fine serrations face out, and fit against eye plate and hex
nuts.
11. Check exhaust guide screws (J), and tighten if necessary.
12. Install muffler cover, and tighten screws securely. Make sure cover
spacer is in place if used on unit.
13. Install guide bar and chain as instructed in Instruction Manual
14. Align tension adjustment pin with bottom adjustment hole in guide bar,
and install clutch cover.
15. Secure clutch cover with guide bar nuts, and tighten finger tight.
16. Check brake band for correct position around clutch drum. Remove and
reinstall clutch cover if necessary.
17. Adjust chain tension as instructed in “Adjustment, Chain Tension” in
Instruction Manual.
18. Push chain brake lever forward to engage chain brake.
19. Remove air filter cover and connect spark plug lead to spark plug.
Replace cover, and secure with knob.
20. Start unit and check chain saw operation.
A
B
C
D
E
F
G
H
I
J
C
I